
Tenant Info
Overview
Tenant Info allows you to view tenant information and configure login and other settings for each user or device belonging to the tenant.
Menu | Sub-menu | Description |
|---|---|---|
You can check the registered tenant information. You can also change the language of automatic emails sent. | ||
Login | You can change the login method for this site. | |
Configure the setting for MFA. | ||
You can configure the RICOH kintone plus Coordination Settings. | ||
You can configure the SAML coordination settings. | ||
Password | You can configure a set of login password policies. | |
You can configure a set of login password expiration date policies. | ||
Device | You can configure a set of the login method on the device to be used by tenant administrators for their tenants. | |
External Use of RICOH Account | You can configure an SAML ID provider. | |
Logs and Licenses | Displays the login history for all users currently logged in on the tenant | |
Displays the system operation log for the tenant being logged in | ||
You can check a list of the services licensed to the tenant to which the user belongs, with their status. | ||
Customization | You can customize this site header. | |
How to See the Menu
In Tenant Info at this site, the following operations are available.
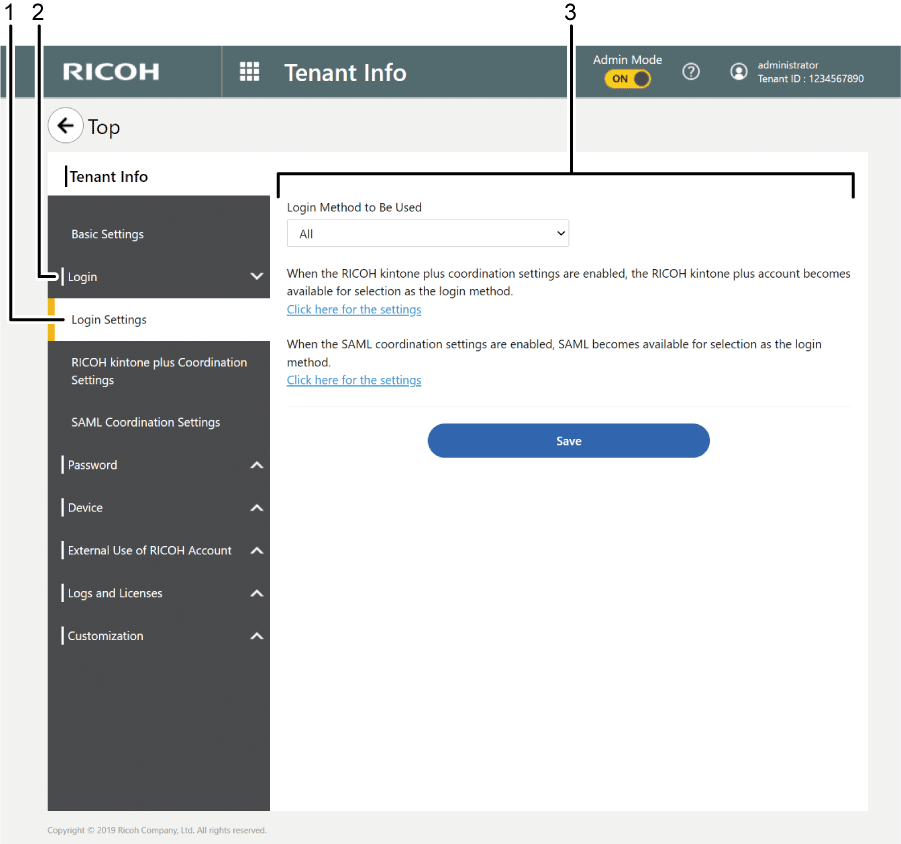
Sub-menu
Displayed when a menu contains sub-menu items
Menu
Displays menu items
Configuration pane
Displays the configuration pane of the selected menu or sub-menu
Basic Settings
Allows you to view basic information about the tenant that you belong to and to specify the language to be used for email notification.
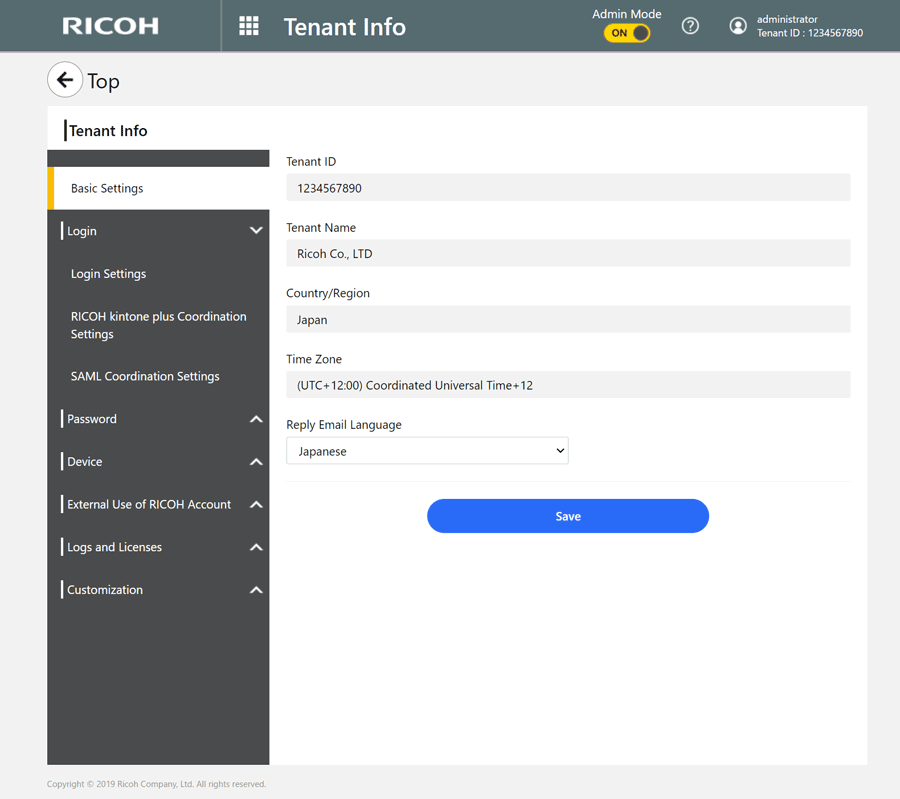
Viewing the tenant information
Allows you to view the tenant ID, tenant name, country and region, and the time zone for the tenant that you are currently logged into
Setting Reply Email Language
Allows you to specify the language to be used for email notification automatically sent by the system; initially, the specified language is used for user registration. For the available languages, see Operating Environment.
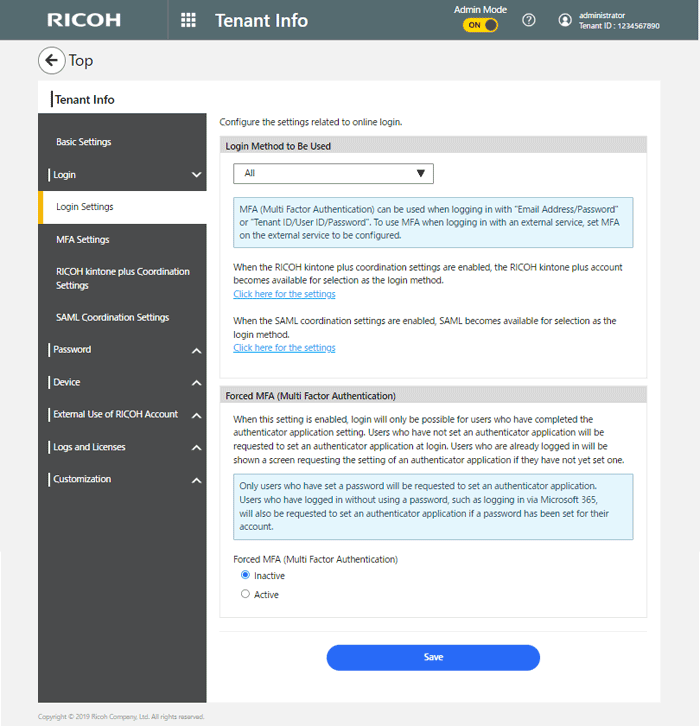
Login Settings
Allows you to specify a login method to be used for the tenant that you belong to.

Login Method to be Used
You can select the login method as follows:
Email Address/Password
Tenant ID/User ID/Password
Microsoft 365 account
RICOH kintone plus account
SAML
All

Microsoft 365 and RICOH kintone plus are external services. Separately, you need to create an account for these.
To use SAML-based login, an account for the external service supporting it is required.
"SAML" is displayed only when SAML coordination is set to be enabled. For information about how to enable SAML coordination, see SAML Coordination Settings.
A "RICOH kintone plus account" is displayed on when RICOH kintone plus coordination is set to be enabled. For information about how to enable RICOH kintone plus coordination, see RICOH kintone plus Coordination Settings.
If "All" is selected, all of the login methods (Email Address/Password, Tenant ID/User ID/Password, Microsoft 365 account, RICOH kintone plus account, and SAML) are made available.
Initially, this option is set to "All".
Forced MFA (Multi Factor Authentication)
To display "Forced MFA (Multi Factor Authentication)", MFA Settings is enabled on the "Login Settings" screen. Specify whether to forcibly use MFA (multi-factor authentication) at login. If you selected "Active", select the checkbox of a type of user for which MFA (multi-factor authentication) is forced.
MFA Settings
Appears when you enable the MFA settings on the "Login Settings" screen.
Configure the MFA settings to use MFA (multi-factor authentication). MFA can be used to let the user log in or reset their password.
The user needs to configure an authentication application in the "MFA Settings" of "My Account Settings". For more details, see MFA Settings.
MFA can be used to log in with a combination of "Email Address/Password" or "Tenant ID/User ID/Password". To use MFA for login with an external service, configure the MFA settings on the external service.
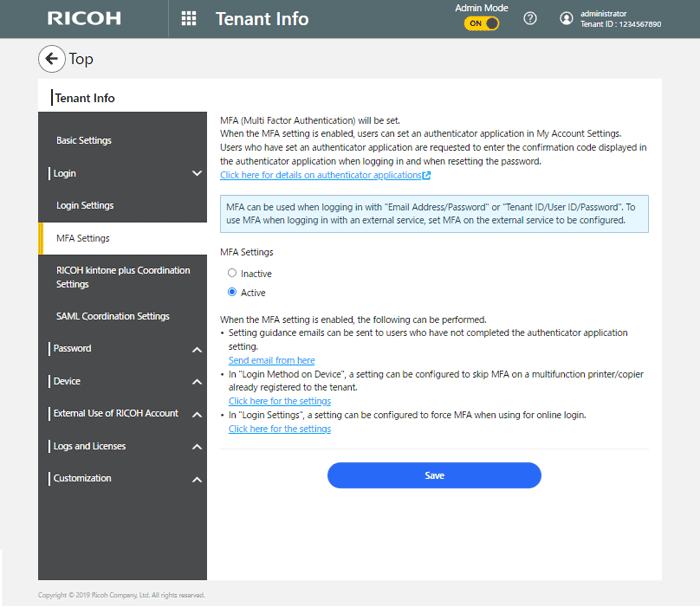
MFA Settings
Enable or disable MFA. Initially, MFA is disabled.
You can send an email to all users who have not configured an authentication application.
Click [Send email from here] to send a bulk invitation email for authentication application configuration to all users who have not configured an authentication application.
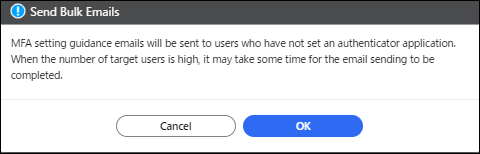
You can use "Send Bulk Emails" on the [User Management] screen to send bulk setting guidance e-mails for the authenticator application setting. For details, see Sending a setting guidance e-mail to users who have not completed the authenticator application setting.
If you do not want to use MFA on a tenant-registered multifunction printer:
Click [Click here for the settings] to display the Login Method on Device screen. On this screen, you can configure whether or not to skip MFA on the tenant-registered multifunction printer. For information about how to configure this, see Login Method on Device.
If you want to always use MFA to log in from the web:
Click [Click here for the settings] to display the Login Settings screen. You can specify whether to use MFA to log into this site. For information about how to configure this, see Login Settings.
RICOH kintone plus Coordination Settings
To use a RICOH kintone plus account provided by Cybozu, Inc. to log into this site, configure the RICOH kintone plus Coordination Settings.

This feature is only available in the following regions.
Japan
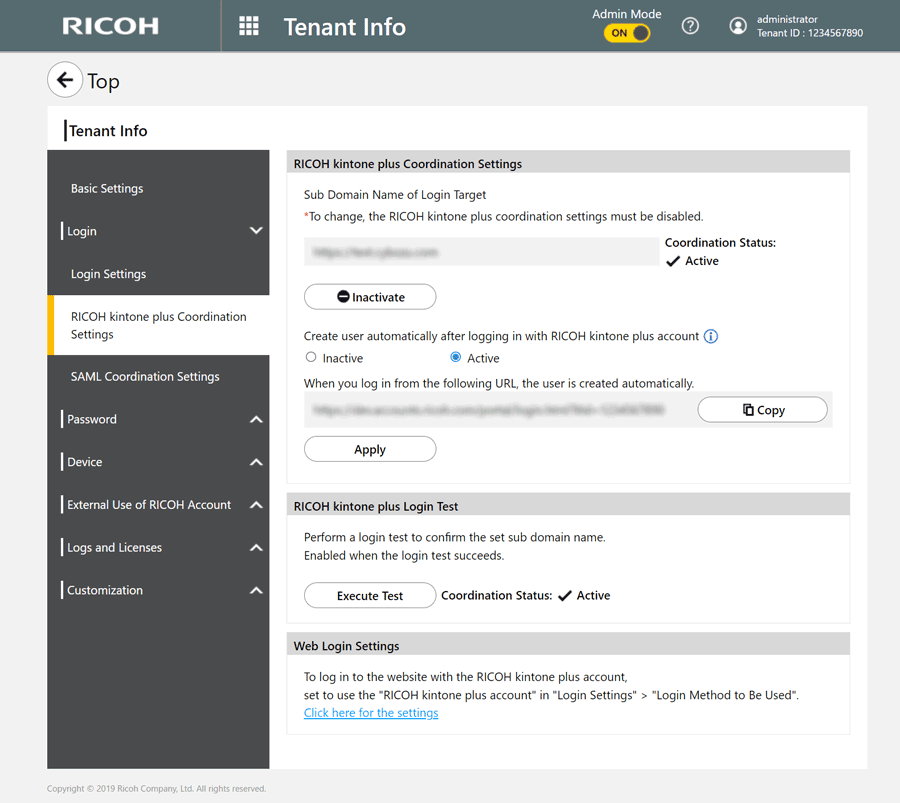
RICOH kintone plus Coordination Settings
Specify the name of the subdomain to log into and enable or disable automatic user creation when you use your RICOH kintone plus account to log in.
RICOH kintone plus Login Test
Performs a test to log into the specified subdomain.
Web Login Settings
Specify the login method for logging into this site with a RICOH kintone plus account.
SAML Coordination Settings
To use an account for an external service supporting SAML (SAML ID provider) to log into this site, configure the "SAML Coordination Settings". Follow the on-screen instructions to specify the ID provider.
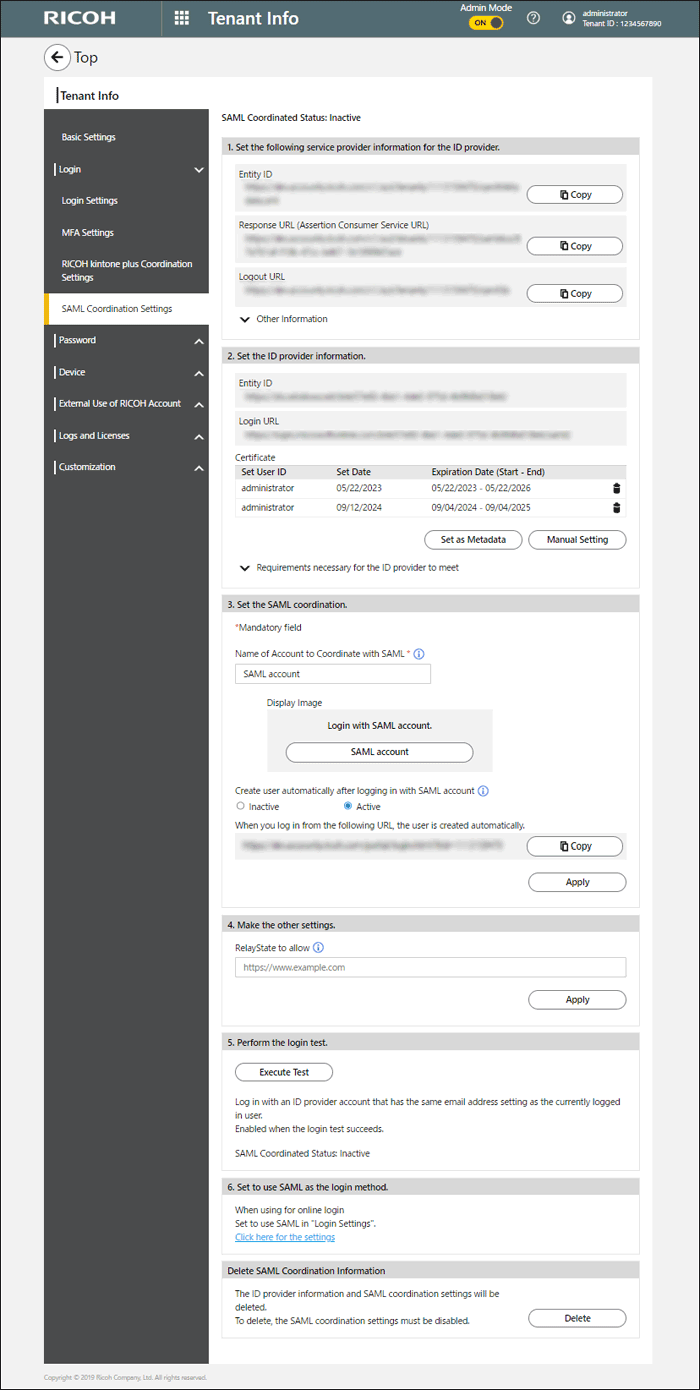
SAML Coordination Settings
Shows the current status of SAML coordination; if the status shows "Active", you can click [Inactive] to disable SAML coordination.
1. Set the following service provider information for the ID provider.
Specify the on-screen information for the ID provider.
2. Set the ID provider information.
Specify the ID provider information for this site.
3. Set the SAML coordination.
Specify the SAML coordination settings.
4. Make the other settings.
If you specify RelayState in the settings on the ID provider side, enter the same URL to "RelayState to allow" in "4. Make the other settings.".
If the RelayState domain is "*.ricoh.com", no setting is required.
5. perform the login test.
Click [Execute Test] to check that you can successfully log in.
If the login test succeeds, SAML coordination is enabled.
6. Set to use SAML as the login method.
Specify use of SAML for logging in.
To use the web to log in, see Login Settings.
Delete SAML Coordination Information
To delete the ID provider information or SAML coordination settings, click [Delete]. Before deletion, be sure to disable SAML coordination.
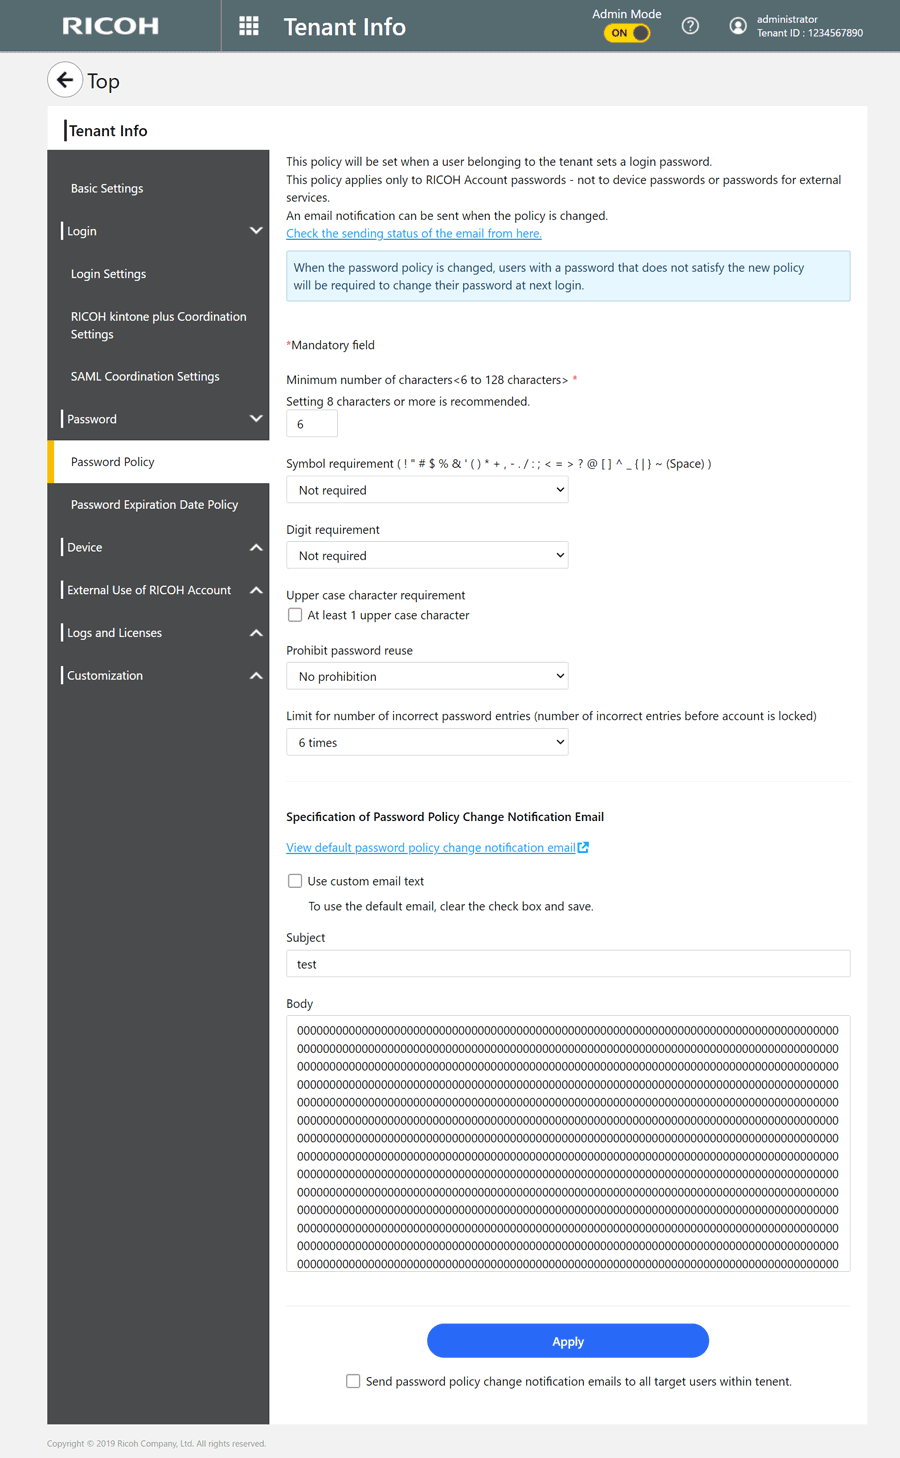
Password Policy
Configure a set of login password policies for the login passwords to be set by member users of your tenant.
Item | Description |
|---|---|
Minimum number of characters <6 to 128 characters>*1 | Set the minimum number of characters for passwords to a value between 6 and 128. |
Symbol requirement | From the drop-down list, select whether a symbol needs to be included in user passwords. |
Digit requirement | From the drop-down list, select whether a numeric needs to be included in user passwords. |
Upper case character requirement | Select the checkbox if one or more uppercase characters needs to be included in user passwords. |
Prohibit password reuse | This is used to prohibit reuse of passwords used by a user in the past. From the drop-down list, select the number of most-recently used passwords to be prohibited from being used. |
Limit for number of incorrect password entries (number of incorrect entries before account is locked) | This is used to lock an account if incorrect passwords are entered. From the drop-down list, select the allowable number of retries to enter a password before locking the account.
|
Specification of Password Policy Change Notification Email | Specify the subject and body of the email as a template to be sent to users when a password policy change occurs. The number of characters that can be used is as follows:
If no template is specified, the default template is used. |
Send password policy change notification emails to all target users within tenant | Select this checkbox if you want to send a mass password policy change notification email to users within your tenant. |
*1 Must be specified
Password Expiration Date Policy
Configure a set of login password date policies for the login passwords to be set by member users of your tenant.
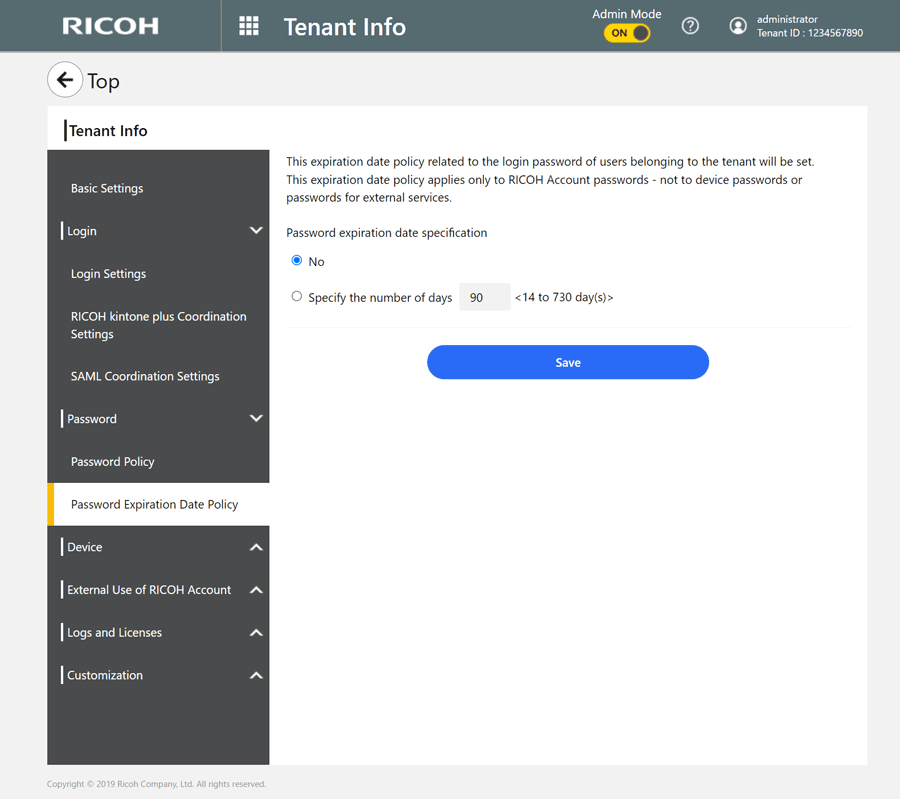
Password Expiration Date Policy Settings
Password expiration date specification
To set up the password expiration date, select "Specify the number of days", and then specify the number of days between 14 and 730 days.
Sending a password expiration date notification email
To send a password expiration date notification email, select "Specify how many days in advance to send", and then specify the number of days before the expiration date, between 1 and 730 days.
Specification of fixed phrase for password Expiration Date Notification Email
You can save the password expiration date notification email as a template by creating a subject and a body of text. If the template is left blank, the default text is used.
 Enter the subject and the body text.
You can save a template with the subject or body text only.
Click [Example of entry from here] to view entry examples or parameter descriptions.
Item | Specifiable characters |
|---|---|
Subject | Specifiable number of characters: 0 to 78 characters |
Body | Specifiable number of characters: 0 to 3,000 characters The URL parameter ({changePasswordUrl}) for the password change screen must be specified. |
 Check "Use saved fixed phrase", and then click [Save].
To delete a saved template, clear the entry fields, and then click [Save].
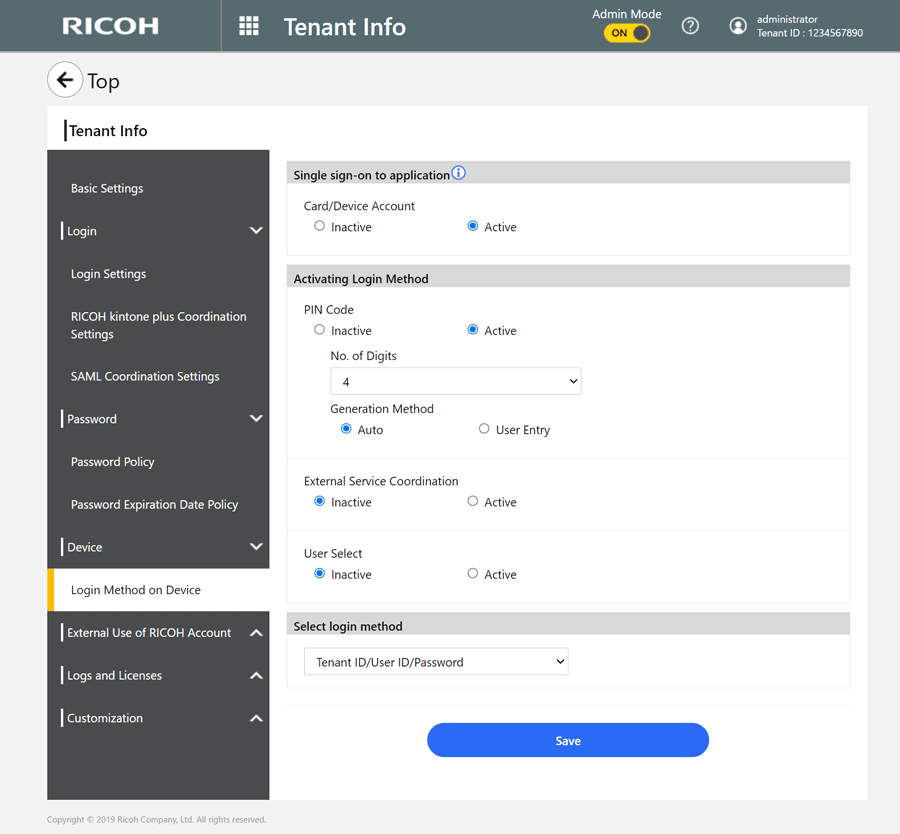
Login Method on Device
Login Method on Device allow you to do the following.
Item | Description |
|---|---|
IC Card/Device Account | Choose whether to enable the use of an IC Card/Device Account link for login. Initially, this option is enabled. |
Item | Description |
|---|---|
PIN Code | Choose whether to enable the use of a PIN code for login. Initially, this option is disabled. If this option is enabled, specify the number of digits and the generation method. The number of digits must be between 4 and 16. The available generation methods are "Auto" and "User Entry". This can be specified if "PIN Code" is enabled. If you choose "User Entry", it allows any PIN to be specified during PIN generation via "Device Login Settings" of "My Account Settings". Regardless of whether you choose " Auto" or "User Entry", a PIN is automatically issued when a new user is added, and a PIN issuance email is sent to the added user. |
External Service Coordination | Choose whether to enable the use of an external service for login. Initially, this option is disabled. If this option is enabled, specify the external service to be used for login. This can be specified if "External Service Coordination" is enabled. |
User Select | Choose whether to enable the selection of a user for login. If this option is enabled, users can be logged in by selecting themselves from a user list. Initially, this option is disabled. |
Item | Description |
|---|---|
- | Selecting the login method to be used to log in from a device. You can choose from the following login methods:
Initially, this option is set to "Email Address/Password". *1 If this option is disabled, this selection is unavailable.
|
Item | Description |
|---|---|
- | When MFA is enabled, select whether or not to skip MFA on the tenant-registered multifunction printer. When you select "Yes", you can log in to a multifunction printer registered with the tenant without a confirmation code even if MFA is enabled for the tenant. |
"Login Method on Device" is not listed if the tenant is not using a multifunction printer/copier.
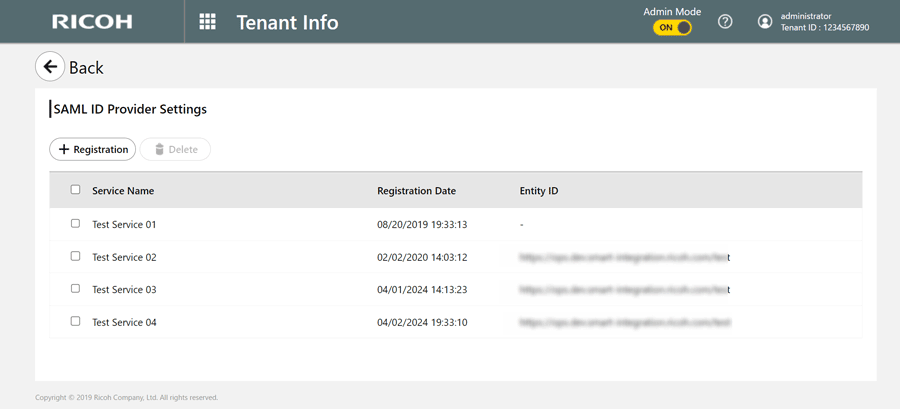
SAML ID Provider Settings
Configure the settings when you use SAML for single sign-on to a service provider.
For details about how to register service providers, see Configuring Single Sign-On (SAML Idp) that Uses RICOH Accounts.
This feature is only available in the following regions.
North America
Latin America
Asia Pacific
EMEA
South Korea
Item | Status |
|---|---|
| Use this to register a new service provider. |
 | Use this to delete service providers that you selected. |
Service provider list | Shows registered service providers, their registration date and time, and their Entity IDs. Placing the mouse over a service provider displays the [Edit] button and the [Delete] button. You can click these buttons to edit or delete service providers. |

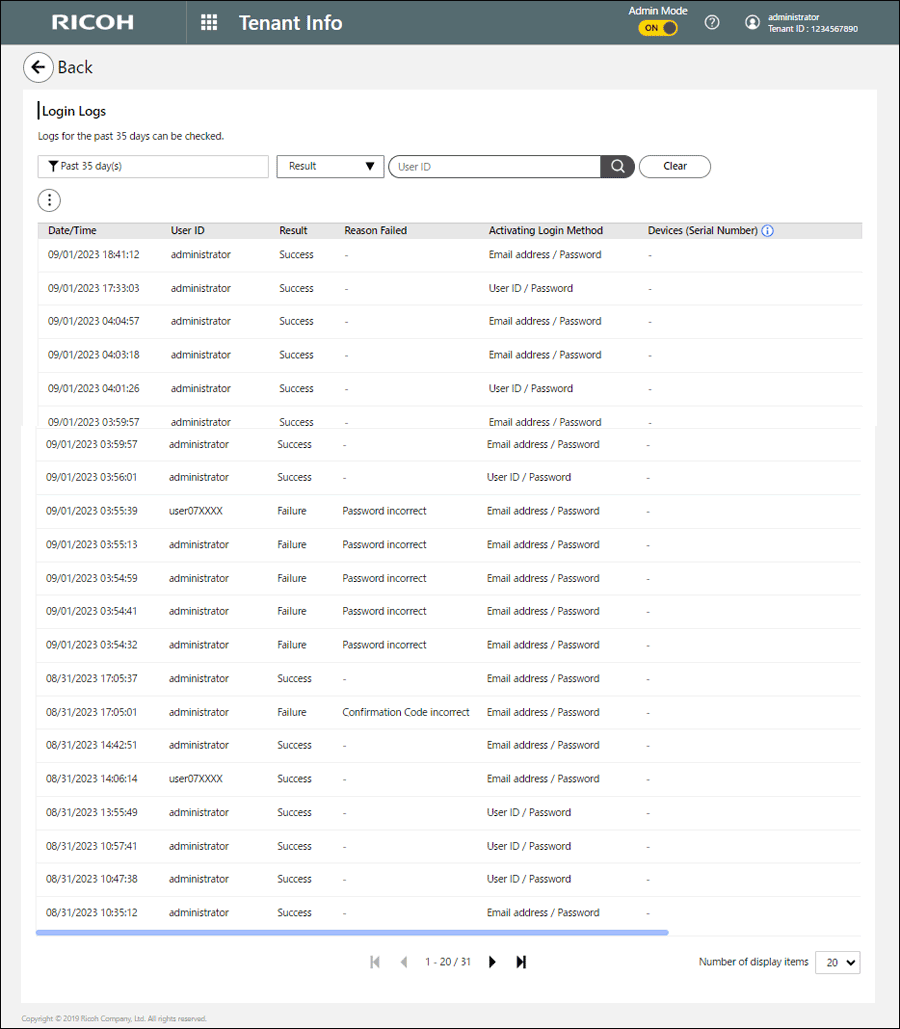
Login Logs
Displays up to past 35 days of login history for all users currently logged in on the tenant
For information about how to export the login log, see Exporting Logs.
Item | Description |
|---|---|
| Clicking displays the pull-down menu. |
 | Filters the login log entries to be listed by time period. Select "Past 24 hour(s)", "Past 7 day(s)", "Past 35 day(s)", or "Custom period". If "Custom" is selected, specify the start and end dates of the period within the range of the past 35 days. |
 | Filters the login log entries to be listed by login result. Select "Success" or "Failure". |
 | Enter a user ID to search the login log. |
 | Resets the search and filter criteria to their initial state so as to list the entire login log |
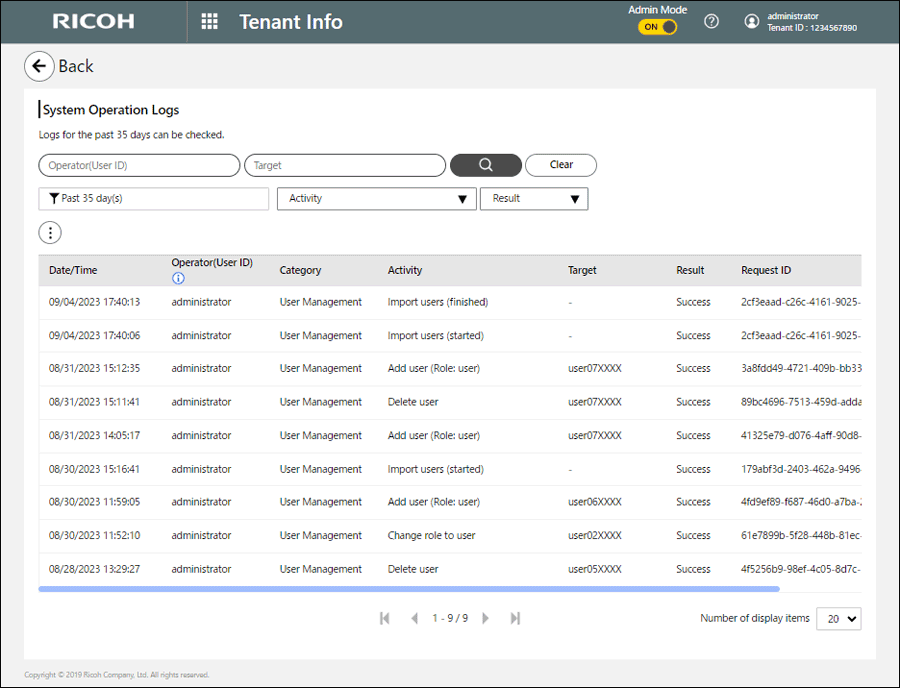
System Operation Logs
Displays up to the past 35 days of system operation log for the tenant being logged in. For information about how to export the system operation log, see Exporting Logs.
Item | Description |
|---|---|
 | Enter a user ID to search the system operation log. |
 | Enter a target to search the system operation log. |
 | When clicked after entering a user ID or target's search keyword, the entered criterion is searched for. |
| Resets the search and filter criteria to their initial state so as to list the entire system operation log |
| Filters the system operation log entries to be listed by time period. Select "Past 24 hour(s)", "Past 7 day(s)", "Past 35 day(s)", or "Custom period ". If "Custom" is selected, specify the start and end dates of the period within the range of the past 35 days. |
 | Filters the system operation log entries to be listed by activity |
| Filter the system operation log entries to be listed by result. Select "Success" or "Failure". |
Exporting Logs
You can export the login and system operation logs in CSV format. An exported file is available for download for up to 72 hours.
You can use either the Login Log or System Operation Log screen for export.
The time zone used for the date and time values exported is based on that was configured for the tenant.
Data and time are in the format of "YYYY/MM/DD HH:mm:ss".
Click , the Menu button, and then select [Export].
Select the log that you want to export.
Initially, all logs are selected.
If you select more than one type of log, the export status is displayed by log type.
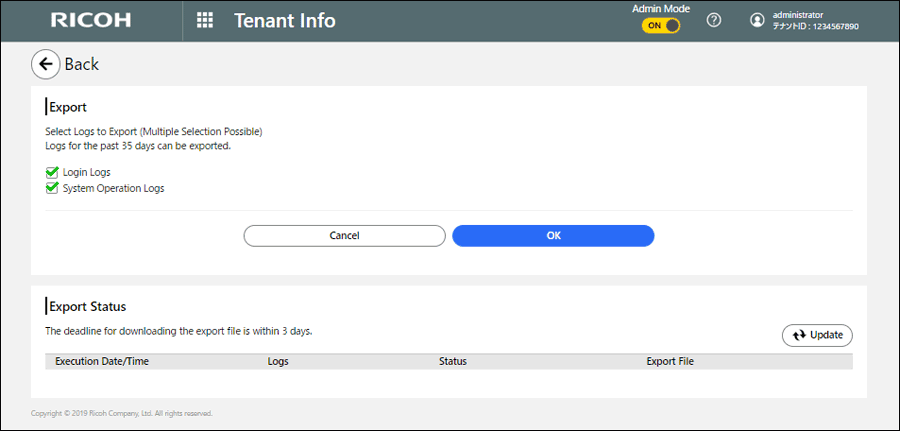
 Click [OK].
The exported log files are listed in the export status list. When the export of a file is complete, its status column changes to "Completed".
 Click [Download] to download the log files.
Date/Time | Operator (User ID) | Category | Activity | Target | Result | Request ID |
|---|---|---|---|---|---|---|
2023/03/20 12:15:00 | admin2 | User Management | Delete user | yamada | Success | g3oxpba3-yj0g-rpuo-4l8k-2qqisnmbj6c7 |
2023/03/19 10:05:00 | admin | User Management | Add user (Role: admin) | suzuki | Failure | gvba0ibc-njex-sr0s-uvip-x3dp7v1tvtc0 |
2023/03/18 16:10:00 | -- System -- | User Management | Add user (Role: admin) | tanaka | Success | 2o6ctayl-hnb0-qr3x-tpca-kxbytpikouta |
2023/03/18 10:10:00 | -- System -- | User Management | Add user (Role: user) | suzuki | Success | 3bewk6up-hiwc-8t25-enf8-qh4vou6b5f5v |
2023/03/16 14:35:00 | admin2 | User Management | Change role to user | yamada | Success | iiyyw70e-lwft-8d6f-sqys-ye1bcbws4suq |
2023/03/10 9:30:00 | admin2 | User Management | Change role to admin | yamada | Success | ak84uolb-dw6w-rn2g-867v-yrt6c0uv7r12 |
License Information List
License Information List provides a list of the services licensed to the tenant to which the user belongs, with their status.

[Status] filter
You can narrow down the services to be displayed by choosing one of the following service use states from the drop-down list:
Status (no filter)
Not Started
Activated
Expired
Service Name
Clicking this column header toggles the table so as to display service names in ascending or descending order.
Service table
Item
Status
Service Name
Shows the name of a licensed service.
Plan Name
Shows the plan name of the service. If the service has no plan, "-" is shown.
Contract Contents
Shows the type of contract that you have: License-count or pay-as-you-go.
If you have a license-count contract, the numbers of devices and users that can use the service are also shown.
For an application that has no limitation on the number of users and for which it is required to manage access to it, "∞" is shown.
For an application that has no limitation on the number of devices or users and for which it is not required to manage access to it, "-" is shown.
Usage Status
For a license-count contract:
The number of licenses with access to an application configured is shown.
For a pay-as-you-go contract:
The actual amount of usage of the month is shown along with that month.
If the usage status is "Not Started" or " Expired", "-" is shown.
Status
Shows the status of the service.
Subscription ID
Shows the Subscription ID.
Usage Period (Start - End)
Shows the start of use and end of use dates of the service. If no period is assigned or not available for display, "-" is shown.
Header Customization Settings
You can change the header accent line color and logo image.

Changing the accent line color
You can change the header accent line color. A custom color can be also set, in addition to four basic colors.
Changing the logo image file
Your original logo image can be set in the header, instead of the RICOH logo. The logo image file specifications are as follows:
File format | jpeg, jpg, png, gif |
File size | 2 MB or less |
Image size | 198 pixels (width) × 72 pixels (height) or less When the image size is bigger than 198 pixels (width) and 72 pixels (height), it is reduced to a smaller size without changing the aspect ratio. |