
Synchronizing IDs
You can add, update, and delete users to/from this service by synchronizing an external user ID authentication management service. Because user registration is completed through synchronization, users will be automatically logged into the service without needing to confirm their e-mail addresses.
Linking users from Microsoft Entra ID
To add, update, and delete users, link users from Microsoft Entra ID.

To use this function, you must be a tenant administrator of the tenant, as well as a Microsoft Entra ID global administrator.
If user addition, updating, or deleting is in progress on Microsoft Entra ID, you cannot do the same operation. Please wait until the processing is complete.
This function supports up to 150,000 Microsoft Entra ID users. If the number of users exceeds 150,000, an error will result.
You cannot add Microsoft Entra ID users having the following user information:
User information that contains one or more four-byte characters
User information that contains no email address
An Azure ID user invited by another organization cannot be linked.
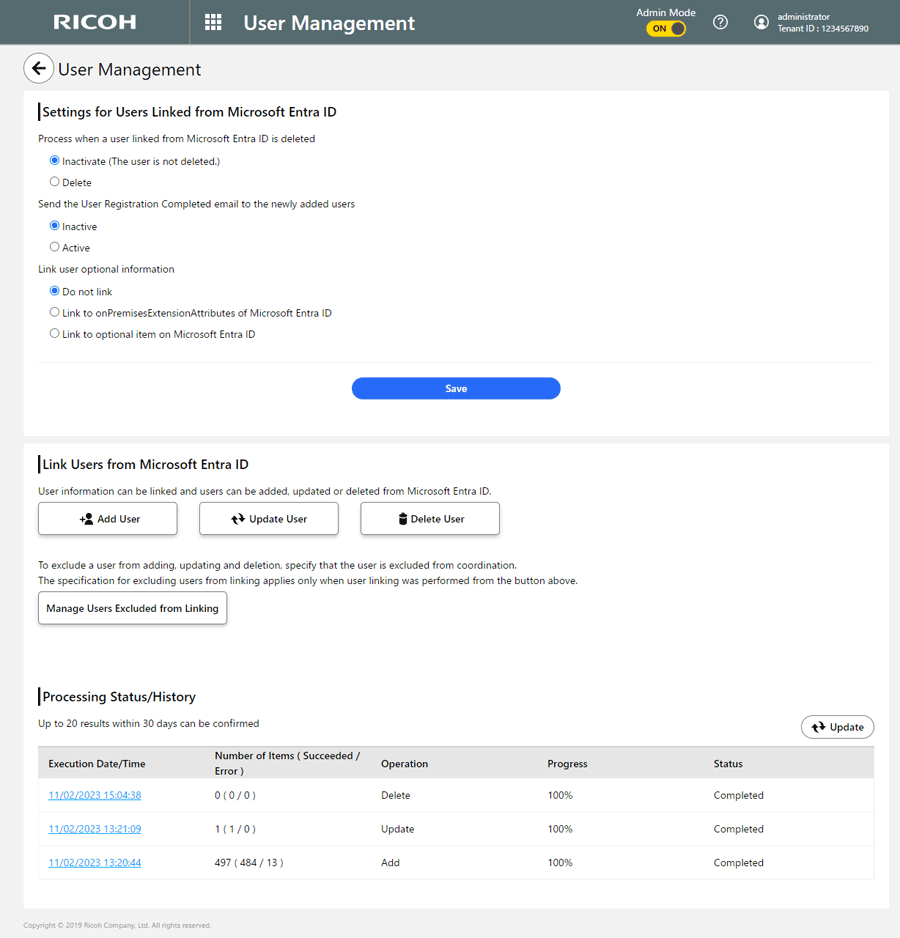
Settings for Users Linked from Microsoft Entra ID
Use this function to configure the process to be performed when a user linked from Microsoft Entra ID is deleted, and whether to send user registration completion email to newly added users, and for the link between user optional information and item names on Microsoft Entra ID.
 Click
Click  , the Menu button, then select [Synchronize IDs], and then select [Link Users from Microsoft Entra ID].
 Select "Process when a user linked from Microsoft Entra ID is deleted", "Send user registration completion email to newly added users", and "Link user optional information".
Process when a user linked from Microsoft Entra ID is deleted
Inactivate: Inactivates the user. The user is not deleted.
Delete: Deletes the user.
The initial value is set to "Delete".
Send user registration completion email to newly added users
Inactive: Does not send user registration completion email.
Active: Sends user registration completion email.
The initial value is set to "Inactive".
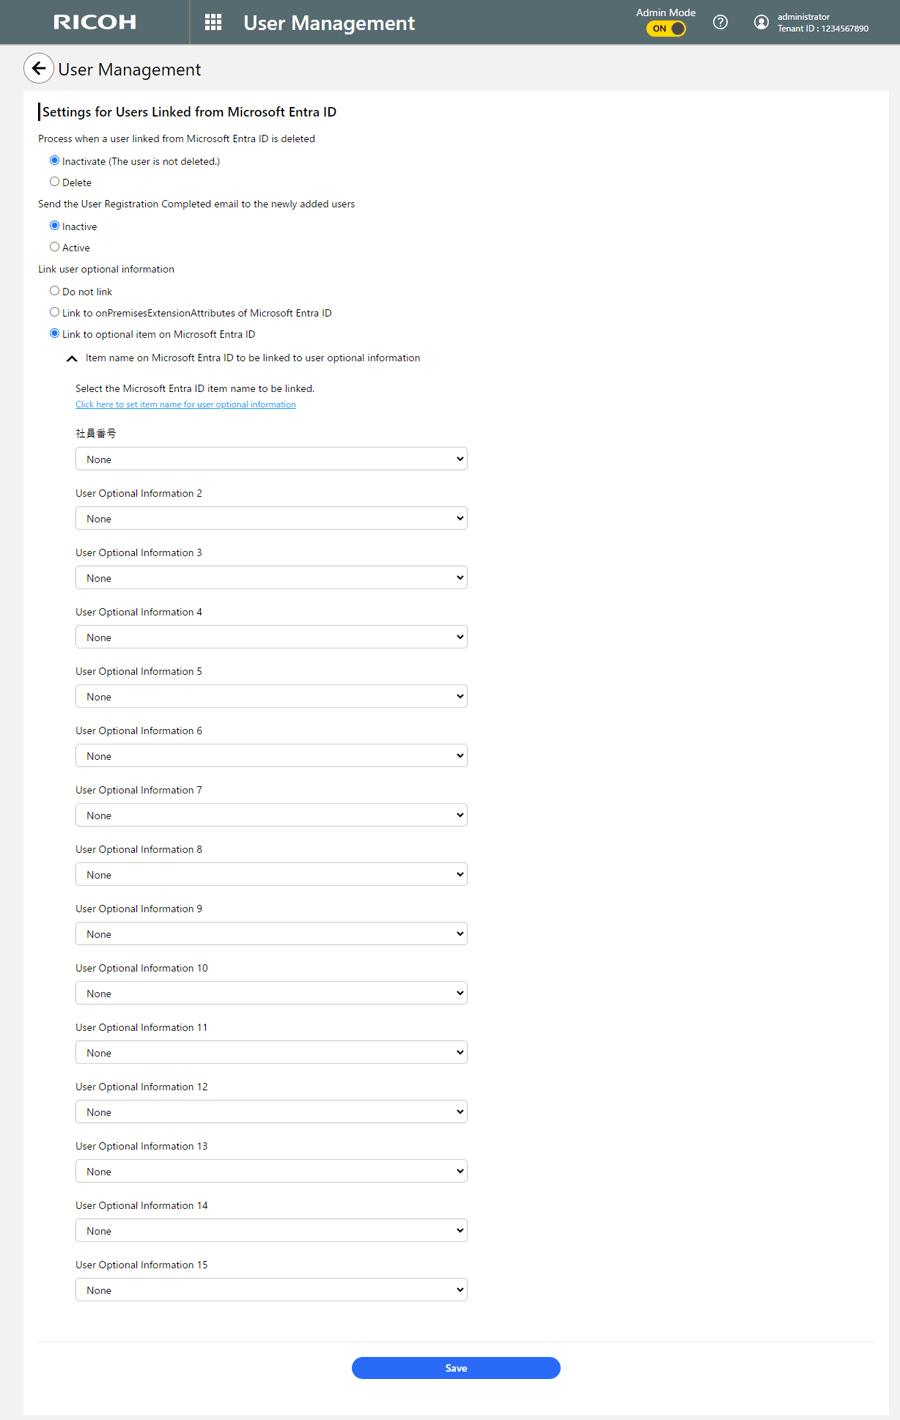
Link user optional information
Do not link: Does not link the user optional information. Proceed to step 4.
Link to onPremisesExtensionAttributes of Microsoft Entra ID: Links user optional information 1 to 5 to onPremisesExtensionAttributes1 to onPremisesExtensionAttributes15. Proceed to step 4.
Link to optional item on Microsoft Entra ID: When selected, "Item name on Microsoft Entra ID to be linked to user optional information" is displayed, and any item name on Microsoft Entra ID to be linked can be specified. Proceed to step 3.
The initial value is set to "Do not link".
 Select an item name on Microsoft Entra ID from the User Optional Information dropdown list.
To change the name of a user optional information item, click "Item name on Microsoft Entra ID to be linked to user optional information". See Changing the names of the user optional information field. For details about the item name in Microsoft Entra ID as per User Optional Information 1 to 15, see “Azure AD Attribute name” in the “Specifiable Microsoft Entra ID Attribute” table on User Information / Group Information Synchronized when Linked with Microsoft Entra ID.
 Click [Save].
Adding users
Add User links you to Microsoft Entra ID, and then it adds users only available in Microsoft Entra ID as new users.
Through the link, this function also updates user information with that in Microsoft Entra ID if all of the following conditions are met:
The user is not yet linked with that in Microsoft Entra ID .
The user has the same email address as that in Microsoft Entra ID.
Click , the Menu button, then select [Synchronize IDs], and then select [Link Users from Microsoft Entra ID].
Click [Add User].
Click [OK].

If "Send user registration completion email to newly added users" is set to "Active", a user registration completion email is sent to a registered user.
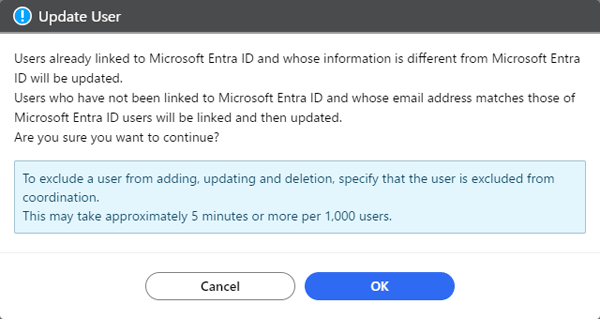
Updating user information
Update User links you to Microsoft Entra ID, and then it updates user information with that in Microsoft Entra ID if all of the following conditions are met:
The user is already linked with Microsoft Entra ID; and
The user has different user information from that in Microsoft Entra ID.
Through the link, this function also updates user information with that in Microsoft Entra ID if all of the following conditions are met:
The user is not yet linked with Microsoft Entra ID; and
The user has the same email address as that in Microsoft Entra ID.

If there is a user to be excluded from the update process, click [Manage Users Excluded from Linking] and add the user to the excluded user list. For more information, see "Managing users to be excluded from linkage”.
Click , the Menu button, then select [Synchronize IDs], and then select [Link Users from Microsoft Entra ID].
Click [Update User].
Click [OK].
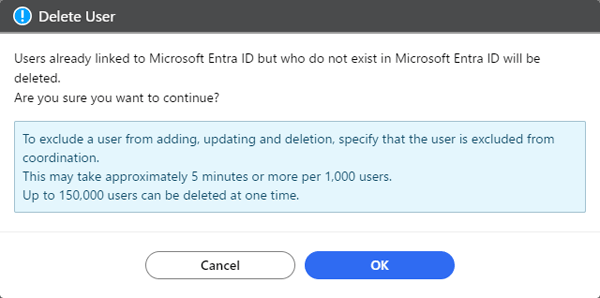
Deleting users
Delete User links you to Microsoft Entra ID, and it delete users if all of the following conditions are met:
The user is already linked with Microsoft Entra ID.
The user is not registered in Microsoft Entra ID.
The user currently performing this operation is not deleted.
If there is a user to be excluded from the delete process, click [Manage Users Excluded from Linking] and add the user to the excluded user list. For more information, see "Managing users to be excluded from linkage".
Click , the Menu button, then select [Synchronize IDs], and then select [Link Users from Microsoft Entra ID].
Click [Delete User].
Click [OK].
Managing users to be excluded from linkage
You can use a list to manage users to be excluded from linkage.
Adding to the list
On the "Manage Users Excluded from Linking" screen, click [Add to List]. Check one or more users to be added, and then click [OK].
You can narrow down the users by entering a user ID, last name, first name, or email address in the search box.
Removing from the list
On the "Manage Users Excluded from Linking" screen, click one or more users to be excluded, and then click [Remove from List].  On the "Confirm" screen, review the users to be excluded, and then click [OK].
Viewing Processing Status or History
You can view a list of the statuses or histories of user linkage with Microsoft Entra ID under "Processing Status/History". The list contains up to 20 events down to the last 30 days.
To view the latest status, click [Update].
To view the details of an event, click its execution date/time link.
Automatically synchronizing users/groups with Microsoft Entra ID
This service can automatically obtain information for a user/group through synchronization with Microsoft Entra ID and can register them as its users. User registration is automatically completed through synchronization with Microsoft Entra ID. Users will be automatically logged into the service without needing to confirm their email addresses.
To use this function, you must be a tenant administrator of the tenant as well as a Microsoft Entra ID global administrator.
An Azure ID user invited by another organization cannot be linked to.
If a group is synchronized, the users/groups belonging to the group will be synchronized as well. However, groups having a circular parent/child relationship are not supported by Microsoft Entra ID automatic synchronization. For example, if Group A has Group B as its child, and if Group B has Group C as its child and Group C has Group A as its child, none of these groups are supported. In such a case, some information may not be synchronized.
To configure settings on Microsoft Entra ID, see Tutorial: How to Automatically Synchronize User/Group Information from Microsoft Entra ID via RICOH Cloud Service.
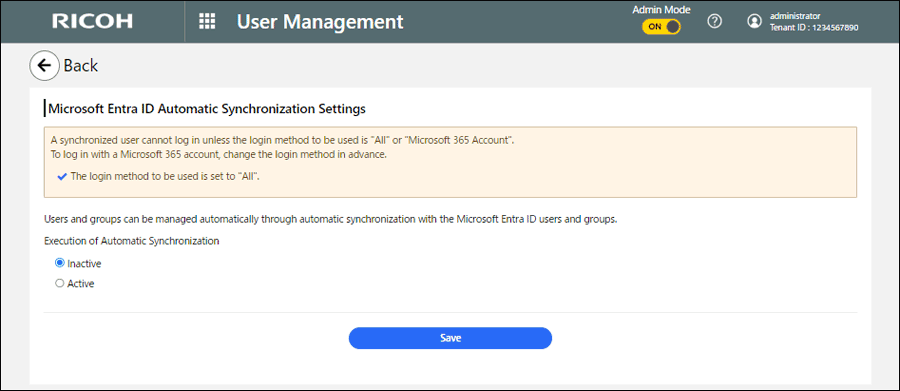
Configuring Microsoft Entra ID Automatic Synchronization
Click , the Menu button, then select [Synchronize IDs], and then select [Microsoft Entra ID Automatic Synchronization].
Confirm that the following is configured:
"Microsoft 365" or "All" is set as the login method for "Login method" in "Tenant Info".
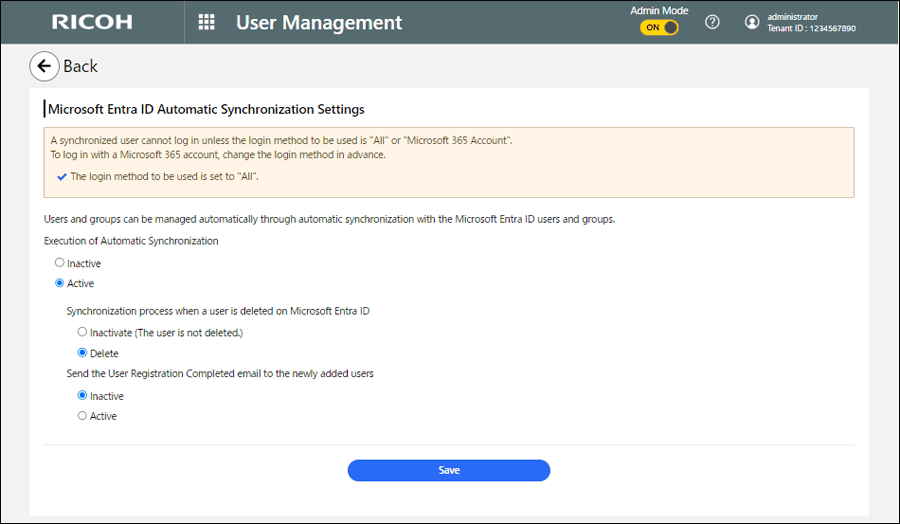
Select "Active" from "Execution of Automatic Synchronization".
Select "Synchronization process when a user is deleted on Microsoft Entra ID " and "Send user registration completion email to newly added users" and then click [ Save].
Synchronization process when a user is deleted on Microsoft Entra ID
Inactivate (The user is not deleted.): When a user is deleted on Microsoft Entra ID, the account status of the user is set to "Inactive" on this site.
Delete: When a user is deleted on Microsoft Entra ID, the user is also deleted on this site.
The initial value is set to "Delete".
Send user registration completion email to newly added users
Inactive: Does not send user registration completion email.
Active: Sends user registration completion email.
The initial value is set to "Active".
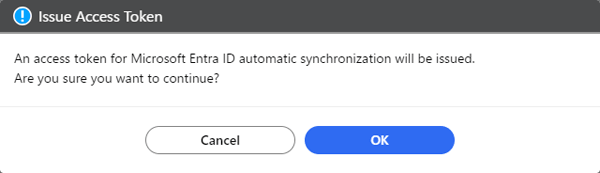
 Click [+Issuance] under "Access Token" in the "Information related to Microsoft Entra ID" area.
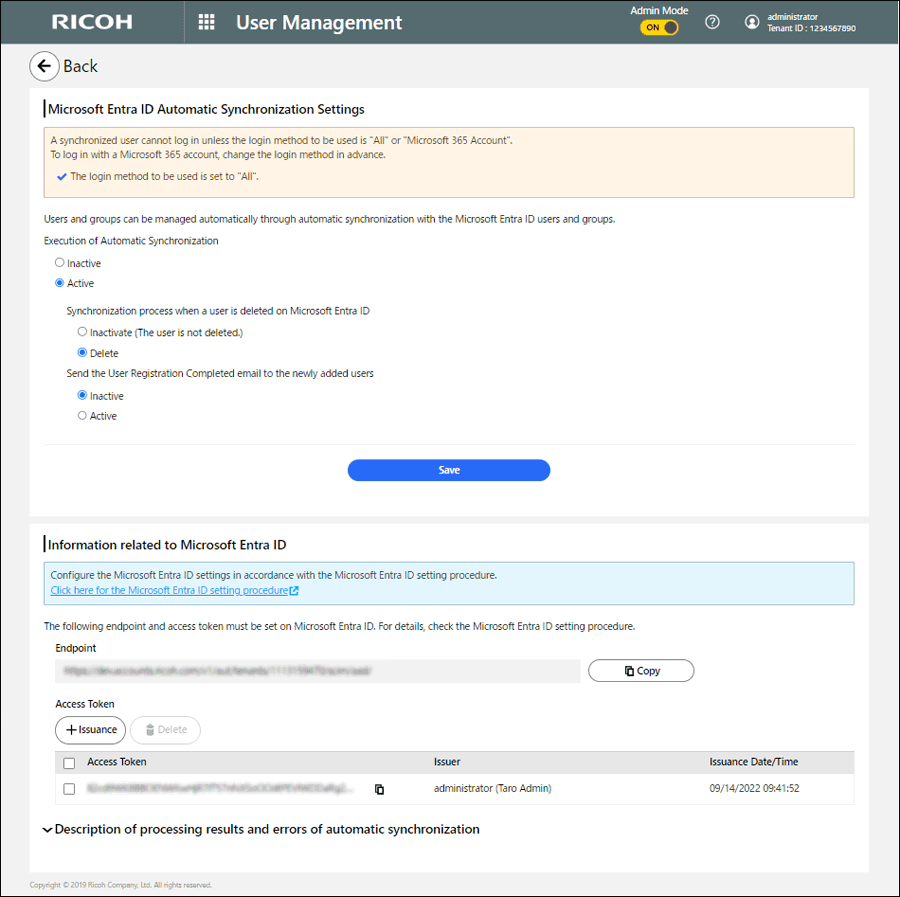
An access token for accessing this service to be set in Microsoft Entra ID will be issued.
 Click [OK].
Up to 10 access tokens can be issued.
Proceed to configuration for Microsoft Entra ID.
 Configure automatic synchronization on the Microsoft Azure Portal.
Review the contents of "Endpoint" and "Access Token", which are displayed in the "Microsoft Entra ID Automatic Synchronization Settings" screen, and then configure Microsoft Entra ID accordingly.
For information about the Microsoft Entra ID-side settings, see Tutorial: How to Automatically Synchronize User/Group Information from Microsoft Entra ID via RICOH Cloud Service.
You can delete an issued token by selecting it from the "Access Token" list and by then clicking [Delete].
If "Send user registration completion email to newly added users" is set to "Active", a user registration completion email is sent to a registered user.
Automatically synchronizing users/groups with Okta
You can automatically obtain user and group information through synchronization with Okta to register them as users of this service.
To use this function, you must be a tenant administrator and Okta super administrator (Super Admin).
This function supports up to 50,000 Okta users. If the number of users exceeds 50,000, synchronization with Okta is not guaranteed.
To configure settings on Okta, see Tutorial: How to Automatically Synchronize User/Group Information from Okta via RICOH Cloud Service.
Configuring Okta Automatic Synchronization
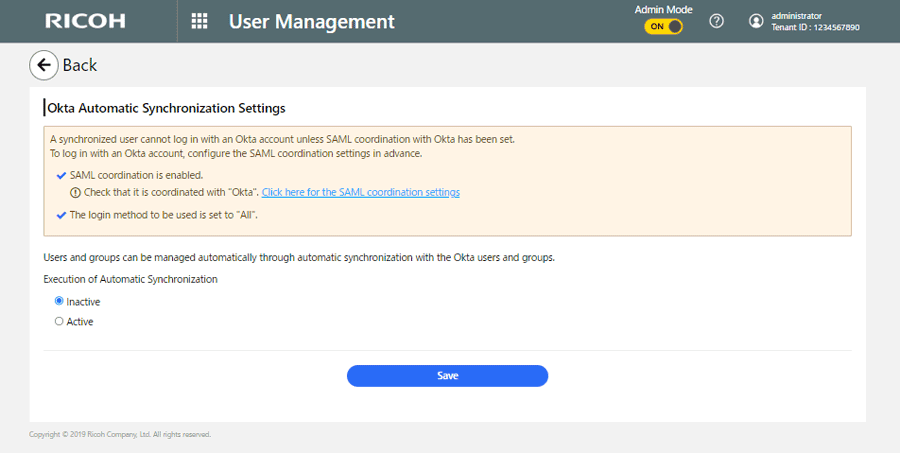
Click , the Menu button, then select [Synchronize IDs], and then select [Okta Automatic Synchronization].
Check that the following requirements are met:
In "SAML Coordination Settings" of "Tenant Information", configuration of the coordination settings for Okta is complete.
In "Login Method" of "Tenant Information", "SAML", and "All" are enabled.
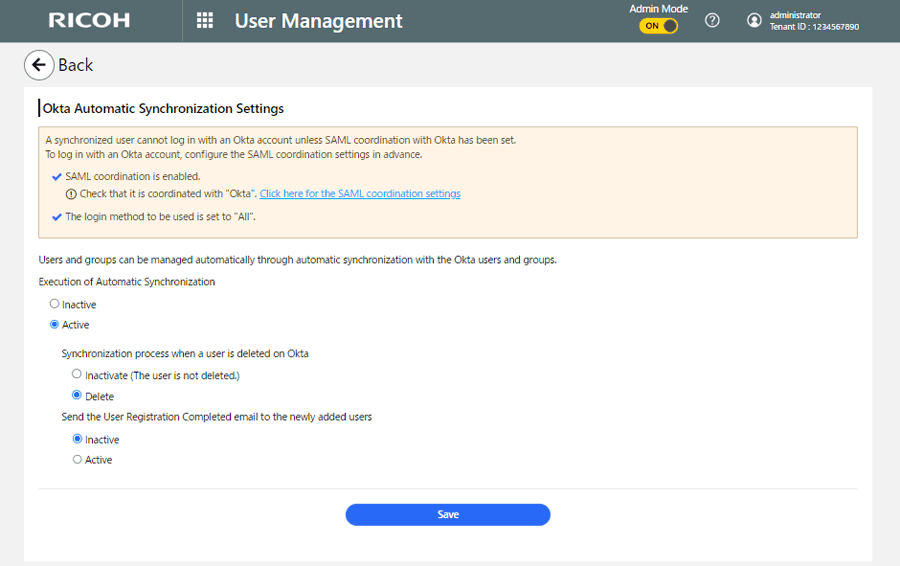
Select "Active" from "Execution of Automatic Synchronization".
Select "Synchronization process when a user is deleted on Okta" and "Send user registration completion email to newly added users", and then click [Save].
Synchronization process when a user is deleted on Okta
Inactivate (The user is not deleted.): When a user is deleted on Okta, the account status of the user is set to "Inactive" on this site.
Delete: When a user is deleted on Okta, the user is also deleted on this site.
The initial value is set to "Delete".
Send user registration completion email to newly added users
Inactive: Does not send user registration completion email.
Active: Sends user registration completion email.
The initial value is set to "Active".
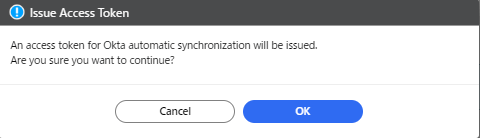
Click [+Issuance] under "Access Token" in the "Information related to Okta" area.
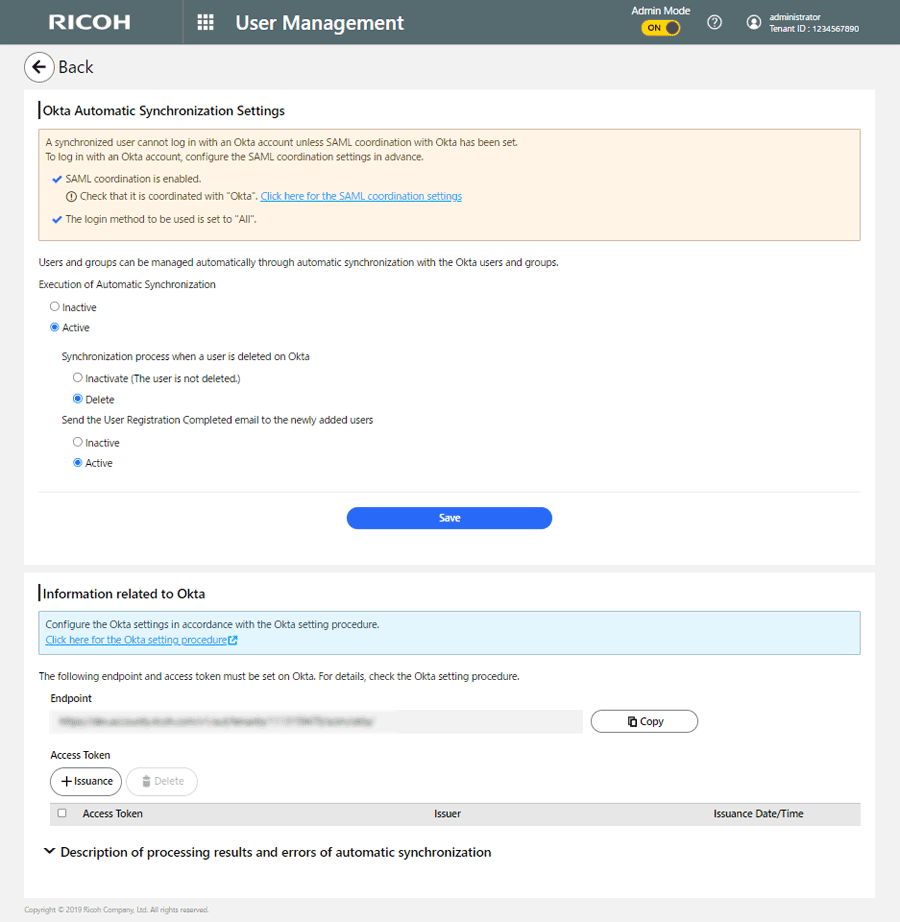
An access token for accessing this service to be set in Okta will be issued.
Click [OK].
Up to 10 access tokens can be issued.
Proceed to configuration for Okta.
On Okta's Admin Console, enable automatic synchronization.
Review the contents of "Endpoint" and "Access Token", which are displayed in the "Okta Automatic Synchronization Settings" screen, and then configure Okta accordingly.
For information about the Okta-side settings, see Tutorial: How to Automatically Synchronize User/Group Information from Okta via RICOH Cloud Service.
You can delete an issued token by selecting it from the "Access Token" list and then by clicking [Delete].
If "Send user registration completion email to newly added users" is set to "Active", a user registration completion email is sent to a registered user.