Configuring the Mapping for Provisioning
Configuring attribute mappings for users
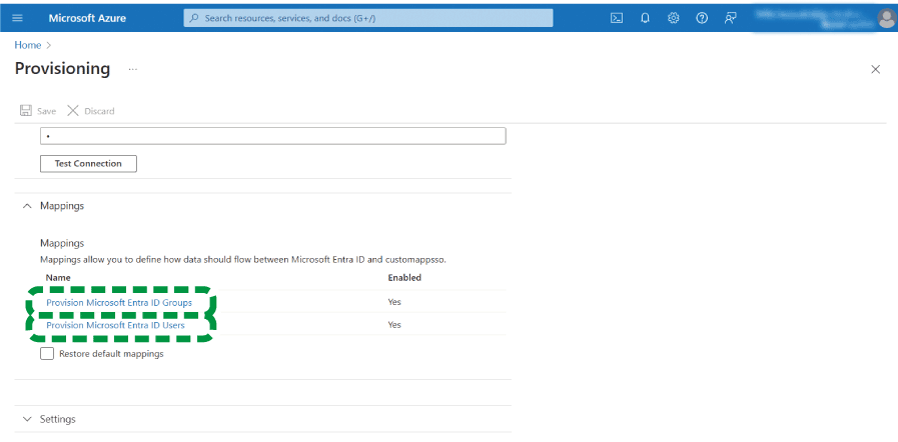
 Click [Mappings].
 Click [Provision Azure Active Directory Users].
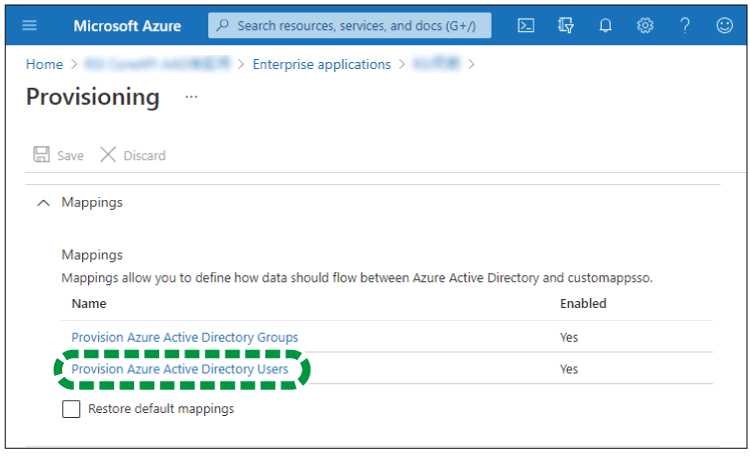
 Select "Yes" for "Enabled".
 In [Attribute Mappings], delete all attribute mappings other than "userPrincipalName" and "Switch([IsSoftDeleted], , "False", "True", "True", "False")".
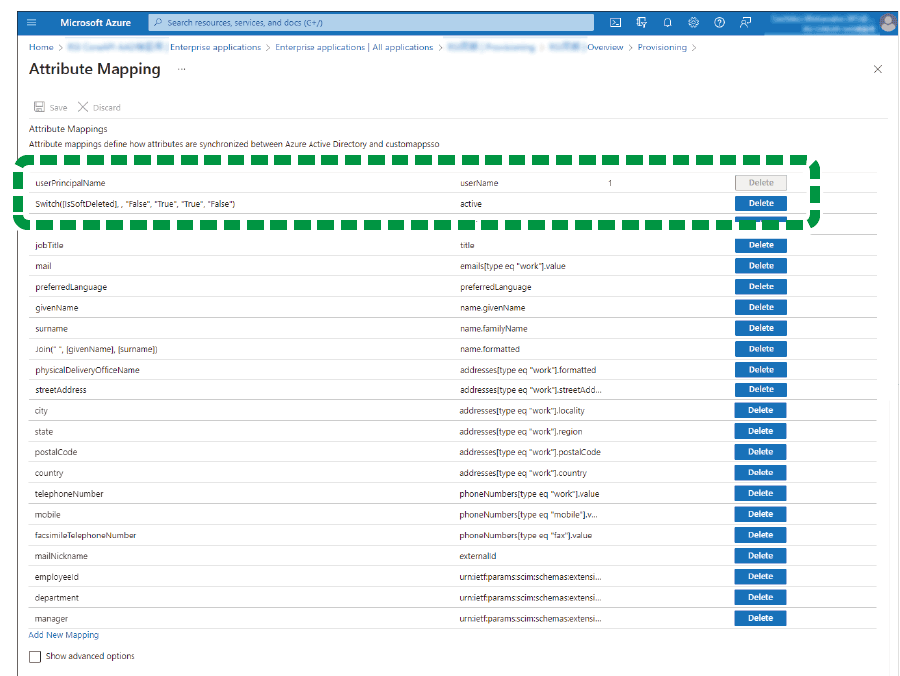

If a required setting is not configured correctly, synchronization or login may fail.
 Configure the required items. Click [userPrincipalName], and on the "Edit Attribute" screen displayed, configure the following settings:
Source attribute: objectId
Target attribute: externalId
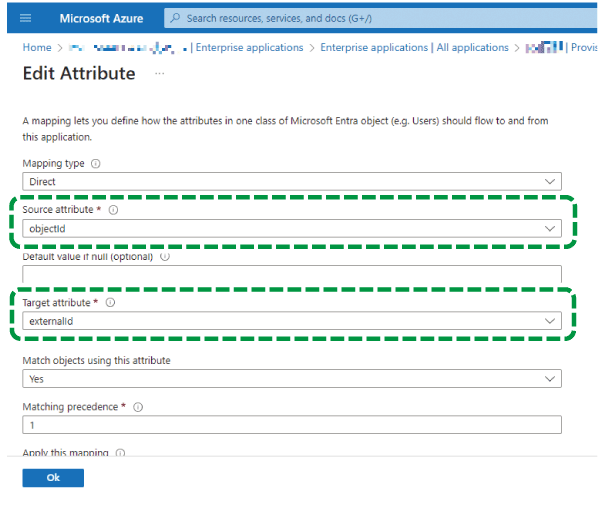
 Click [OK].
 Click [Save].
 Click [Yes].
 Check that the "customappsso" attribute of "Switch([IsSoftDeleted], , "False", "True", "True", "False")" is set to "active".
If the attribute is not set to "active", click "Switch([IsSoftDeleted], , "False", "True", "True", "False")" and change the "Target attribute" to "Active".
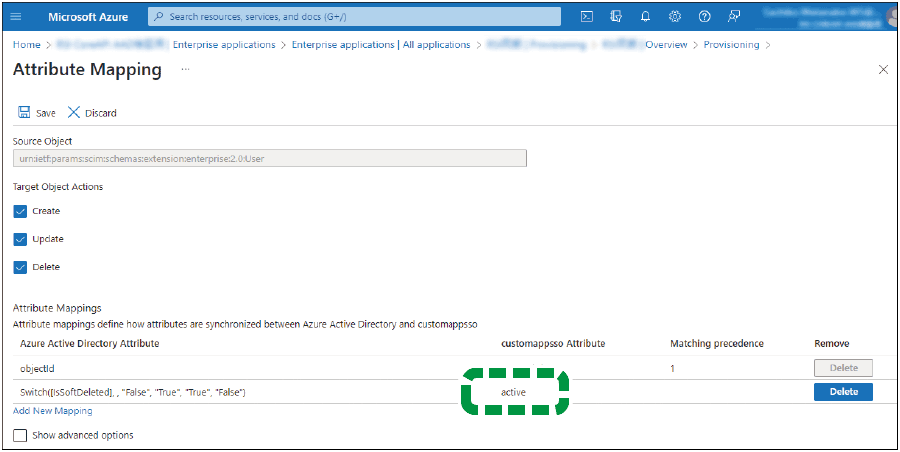
 Click [Save].
 Click [Add New Mapping], and on the "Edit Attribute" screen displayed, change the following settings:
Source attribute: mail
Target attribute: emails[type eq "work"].value
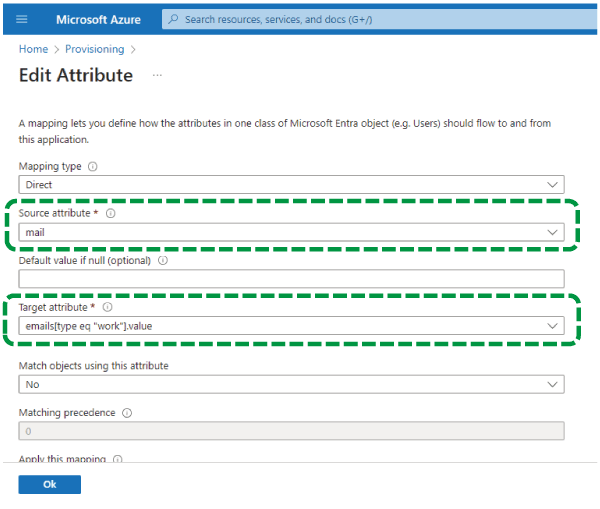
 Click [Ok].
 Click [Add New Mapping], and on the "Edit Attribute" screen displayed, change the following settings:
Source attribute: originalUserPrincipalName
Target attribute: userName

 Click [Ok].
 Check the valuesare set as below.
|
Microsoft Entra ID Attribute |
Customappsso Attribute |
Matching precedence |
|---|---|---|
|
objectId |
1 |
|
|
Switch([IsSoftDeleted], , "False", "True", "True", "False") |
(blank) |
|
|
|
(blank) |
|
|
originalUserPrincipalName |
(blank) |

If a required setting is not configured correctly, synchronization or login may fail.
 Click [Save].
 Click [Ok].
These are all the items that you need to configure.
To synchronize arbitrary items, proceed to "Synchronizing Arbitrary Items".
To synchronize other items, proceed to "Synchronizing Other items".
If you want to skip these steps after configuring the attribute mapping settings, proceed to "Configuring attribute mappings for groups".
Synchronizing Arbitrary Items
Depending on the synchronized items with Microsoft Entra ID, add the new mapping arbitrarily.
Click [Add New Mapping], and on the "Edit Attributes" screen displayed, change the value referring to the following table depending on the items:
Synchronized item on this site
Microsoft Entra ID Attribute
Customappsso Attribute
Matching precedence
Given name of users
givenName
(blank)
Surname of users
surname
(blank)
Department of users
department
(blank)
Office address of users
physicalDeliveryOfficeName
(blank)
Click [Save] when finished adding new mappings.
Click [Yes].
Click [Setting].
Synchronizing Other Items
When synchronizing the other Microsoft Entra ID Attribute, the map to User Optional Information 1 to 15 as follows:
Click [Add New Mapping], and on the "Edit Attributes " screen displayed, change the value referring to the following table depending on the items:
Synchronized item on this site
Microsoft Entra ID Attribute
Customappsso Attribute
Matching precedence
User Optional Information 1 to 15
Item name included in user information of Microsoft Entra ID that can be added as the synchronization target.
Example: employeeId
urn:ietf:params:scim:schemas:extension:2.0:
ExtensionAttributes:extensionAttribute{number} *1Example: urn:ietf:params:scim:schemas:extension:2.0:
ExtensionAttributes:extensionAttribute3(blank)
*1 {number} is displayed the number from 1 to 15 corresponding to user information numbers 1 to 15.
Click [Save] when finished adding new mappings.
Click [Yes].
Click [Setting].
Linking the Device Account or IC Card Information of the Device Account Link Settings
When synchronizing the Device account or IC card of the Device Account Link Settings, you can map it to the Device Account Link Settings as below:
For each item, click [Add New Mapping], and then refer to the following table to make changes in the "Edit Attribute" screen.
Synchronized item on this site
Azure Active Directory Attribute
customappsso Attribute
Matching precedence
Device account of multifunction printers/copiers in the Device Account Link Settings for a user
View the user information of Microsoft Entra IDs that can be added to the Device Account Link Settings, and then select a Microsoft Entra ID Attribute that contains the Device account information.
Example: extensionAttribute1
urn:ietf:params:scim:schemas:extension:
RicohSmartIntegration:2.0:User:onpremiseAccountId
(type=mfp_address_book,deviceType=RicohMfp,index=1)(blank)
IC card of multifunction printers/copiers in the Device Account Link Settings for a user
View the user information of Microsoft Entra IDs that can be added to the Device Account Link Settings, and then select a Microsoft Entra ID Attribute that contains the IC card information.
Example: extensionAttribute1
urn:ietf:params:scim:schemas:extension:
RicohSmartIntegration:2.0:User:onpremiseAccountId
(type=card,deviceType=RicohMfp,index={number}) *1Example: urn:ietf:params:scim:schemas:extension:
RicohSmartIntegration:2.0:User:onpremiseAccountId
(type=card,deviceType=RicohMfp,index=1)(blank)
Device account of Interactive Whiteboard in the Device Account Link Settings for a user
View the user information of Microsoft Entra IDs that can be added to the Device Account Link Settings, and then select a Microsoft Entra ID Attribute that contains the Device account information.
Example: extensionAttribute1
urn:ietf:params:scim:schemas:extension:
RicohSmartIntegration:2.0:User:onpremiseAccountId
(type=address_book,deviceType=RicohIwb,index=1)(blank)
IC card of Interactive Whiteboard in the Device Account Link Settings for a user
View the user information of Microsoft Entra IDs that can be added to the Device Account Link Settings, and then select a Microsoft Entra ID Attribute that contains the IC card information.
Example: extensionAttribute1
urn:ietf:params:scim:schemas:extension:
RicohSmartIntegration:2.0:User:onpremiseAccountId
(type=card,deviceType=RicohIwb,index=1)(blank)
*1 {number} displays the number from 1 to 3 corresponding to IC card 1 to 3 in the Device Account Link Settings.
Click [Save] when finished adding new mappings.
Click [Yes].
Click [Setting].

If the "customappsso Attribute" setting is not available, check that the setting has already been configured in another attribute. If the setting is not configured in another attribute, configure "customappsso" as an additional attribute. See Supplementary procedures: When setting customappsso as an additional attribute for instructions.
Configuring attribute mappings for groups
To disable synchronization for any group:
 Click [Mappings].
 Click [Provision Azure Active Directory Groups].
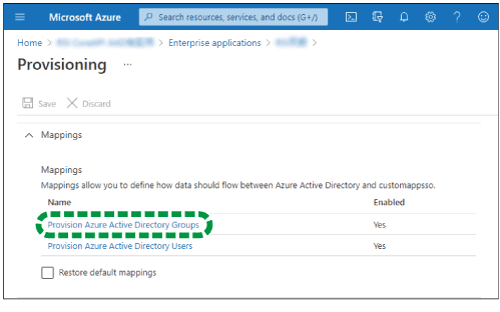
 Select "No" for "Enabled", and then click [Save].
To synchronize groups:
 Click [Mappings].
 Click [Provision Azure Active Directory Groups].

 Select "Yes" for "Enabled".
 In [Attribute Mappings], delete all attribute mappings other than "displayName".
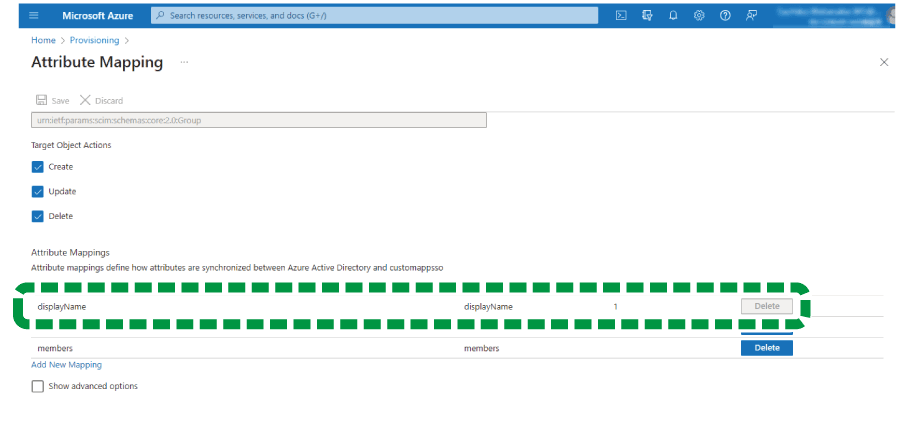

If a required setting is not configured correctly, synchronization or login may fail.
 Configure the required items. Click [userPrincipalName], and on the "Edit Attribute" screen displayed, configure the following settings:
Source attribute: objectId
Target attribute: externalId
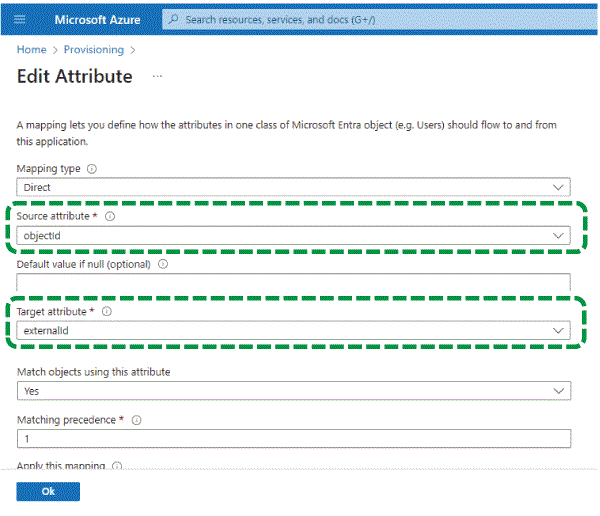
 Click [OK].
 Click [Save].
 Click [Add New Mapping], and on the "Edit Attribute" screen displayed, change the following settings:
Source attribute: displayName
Target attribute: displayName
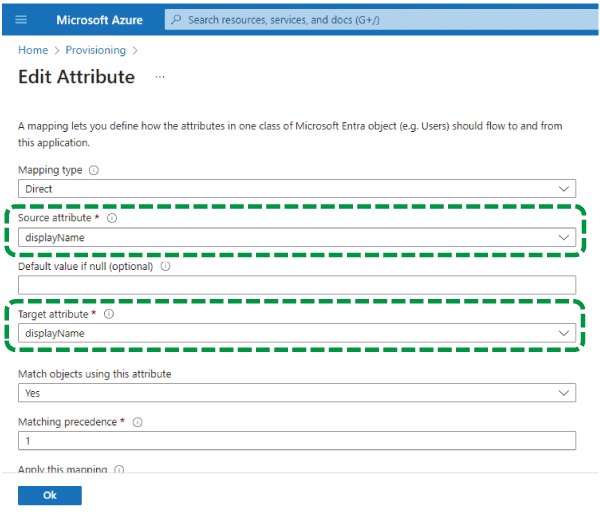
 Click [Ok].
 Click [Add New Mapping], and on the "Edit Attribute" screen displayed, change the following settings:
Source attribute: members
Target attribute: members
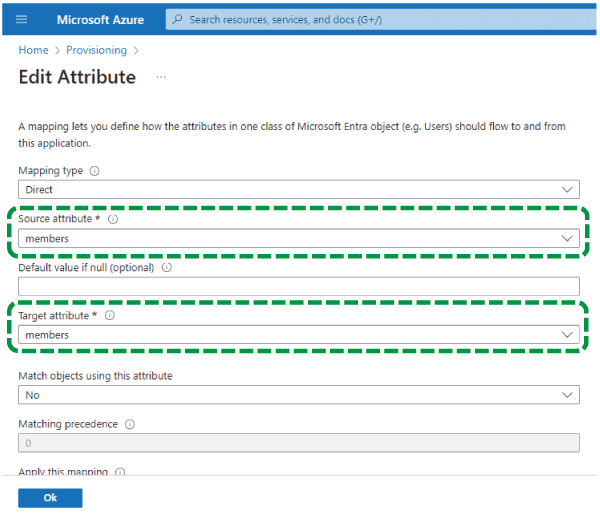
 Click [Ok].
 Check the values are set as below.
|
Microsoft Entra ID Attribute |
Customappsso Attribute |
Matching precedence |
|---|---|---|
|
objectId |
1 |
|
|
displayName |
(blank) |
|
|
members |
(blank) |

If a required item is not specified correctly, synchronization or login attempts might fail.
 Click [Save].
 Click [Ok].
These are all the items that you need to configure.
To synchronize arbitrary items, proceed to "Synchronizing Arbitrary Items".
If you want to skip these steps after configuring the attribute mapping settings, proceed to Configuring the Scope of Synchronization.
Synchronizing Arbitrary Items
Depending on the synchronized items with Microsoft Entra ID, add the new mapping arbitrarily.
Click [Add New Mapping], and on the "Edit Attributes " screen displayed, change the value referring to the following table depending on the items:
Synchronized item on this site
Microsoft Entra ID Attribute
Customappsso Attribute
Matching precedence
Descriptions of gloups
descriptions
(blank)
Click [Save] when finished adding new mappings.
Click [Yes].
To synchronize some specific groups only:
On "Source Object Scope", click [All records].
Click [Add scoping filter].
Configure the filter as shown in the table below, and then click [OK].
To synchronize security groups only:
Target attribute
Operator
Value
mailEnabled
IS FALSE
None
securityEnabeld
IS TRUE
None
Title for the scope filter
security
To synchronize Microsoft 365 groups only:
Target attribute
Operator
Value
groupTypes
INCLUDES
Unified
mailEnabled
IS TRUE
None
Title for the scope filter
microsoft365
Other filtering examples
You can use a Microsoft Entra ID group property for a scope filter to include specific groups to be synchronized.
Examples:
Use an object ID to exclude specific groups from synchronization:
Target attribute
Operator
Value
objectId
NOT EQUALS
(Object ID to be excluded from synchronization)
To exclude groups created on-premise from synchronization:
Target attribute
Operator
Value
onPremiseSecurityIdentifier
IS NULL
None

If two or more filterers are specified, the groups that match one of the filter criteria are included (ORed). To synchronize only the groups that match all criteria, you need to include them in a single filter (ANDed).

If the "customappsso Attribute" setting is not available, check that the setting has already been configured in another attribute. If the setting is not configured in another attribute, configure "customappsso" as an additional attribute. See Supplementary procedures: When setting customappsso as an additional attribute for instructions.
Supplementary procedures: When setting customappsso as an additional attribute
 For group attributes, click "Provision Azure Active Directory Groups"; for user attributes, click "Provision Azure Active Directory Users".
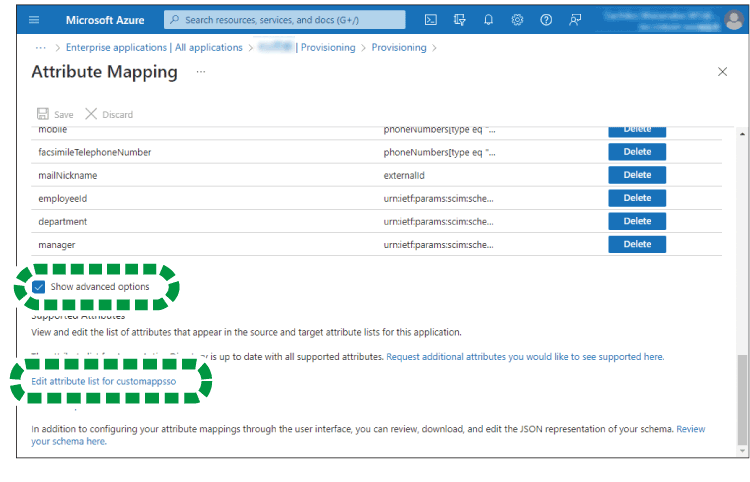
 On the "Attribute Mapping" screen, check "Show advanced options", and then click [Edit attribute list for customappsso].
 For a user attribute, select a user's customappsso attribute that you want to add from the customappsso attribute list for the user; for a group attribute, select a customappsso attribute from the customappsso attribute list for the group. If no customappsso attribute is available, add an attribute, and then use the following table to configure it.

Settings for the customappsso attribute list of users
Name
Type
Primary Key?
Required?
id
String


externalId
String

active
String
emails[type eq "work"].value
String
userName
String

name.givenName
String
name.familyName
String
urn:ietf:params:scim:schemas:extension:
enterprise:2.0:User:departmentString
addresses[type eq "work"].formatted
String
urn:ietf:params:scim:schemas:extension:2.0:
ExtensionAttributes:extensionAttribute{number} *1String
urn:ietf:params:scim:schemas:extension:
RicohSmartIntegration:2.0:User:onpremiseAccountId
(type=mfp_address_book,deviceType=RicohMfp,index=1)String
urn:ietf:params:scim:schemas:extension:
RicohSmartIntegration:2.0:User:onpremiseAccountId
(type=card,deviceType=RicohMfp,index={number})*2String
urn:ietf:params:scim:schemas:extension:
RicohSmartIntegration:2.0:User:onpremiseAccountId
(type=address_book,deviceType=RicohIwb,index=1)String
urn:ietf:params:scim:schemas:extension:
RicohSmartIntegration:2.0:User:onpremiseAccountId
(type=card,deviceType=RicohIwb,index=1)String
*1 {number} displays the number from 1 to 15 corresponding to user information numbers 1 to 15.
*2 {number} displays the number from 1 to 3 corresponding to IC card 1 to 3 in the Device Account Link Settings.

Do not configure the following fields:
Multi-Value?
Exact case?
API Expression
Reference Object Attribute
Settings for the customappsso attribute list of groups
Name
Type
Primary Key?
Required?
Multi-Value?
Reference Object Attribute
id
String


externalId
String

displayName
String

members
Reference

urn:ietf:params:scim:schemas:
core:2.0:Groupurn:ietf:params:scim:schemas:
extension:enterprise:2.0:User
urn:ietf:params:scim:schemas:
extension:2.0:Group:descriptionString

Do not configure the following fields:
Exact case?
API Expression
 Click [Save].
 Click [Yes].

