How to Configure SCIM for admins
Prerequisites
Prepare an administrator account for RICOH Smart Integration.
Supported Features
The Okta SCIM integration currently supports the following features:
Create users
Users in Okta that are assigned to the RICOH Smart Integration application within Okta are automatically added as users in RICOH Smart Integration.Update user attributes
When user attributes are updated in Okta, they will be updated in RICOH Smart Integration.Deactivate users
When users are deactivated in Okta, they will be disabled or deleted within RICOH Smart Integration – which prevents the user from logging into RICOH Smart Integration.Group push
Groups and their users in Okta can be pushed to RICOH Smart Integration.
For more information on the feature, visit the Okta Glossary.
Configuration Steps
1. Configuring SAML integration settings
 SAML integration settings are required for auto-synchronized user logins. Follow the steps in How to Configure SAML for admins.
2. Configuring the Provisioning
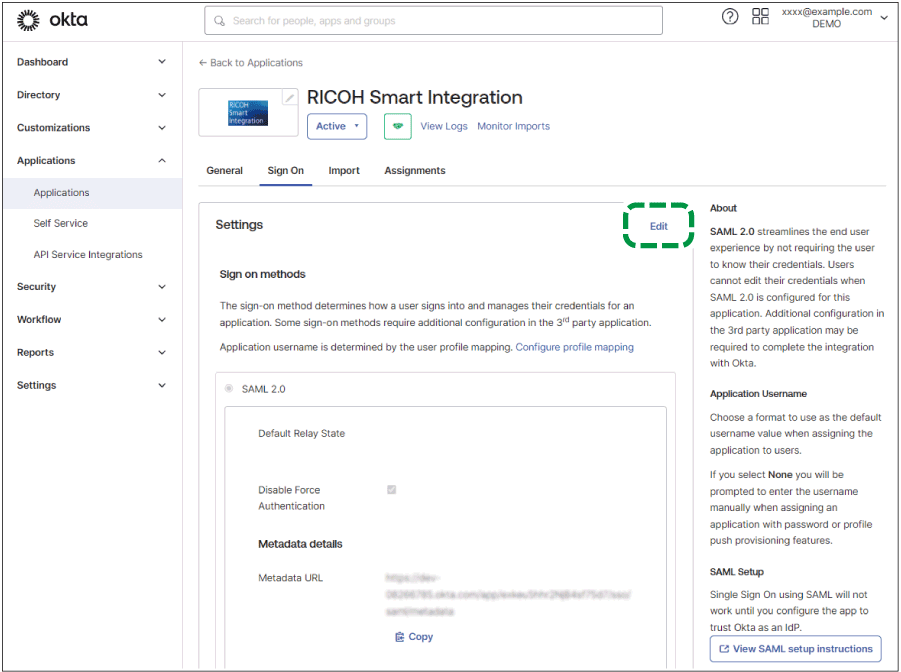
 Open the "Sign on" tab, and then click [Edit] for [App Settings].
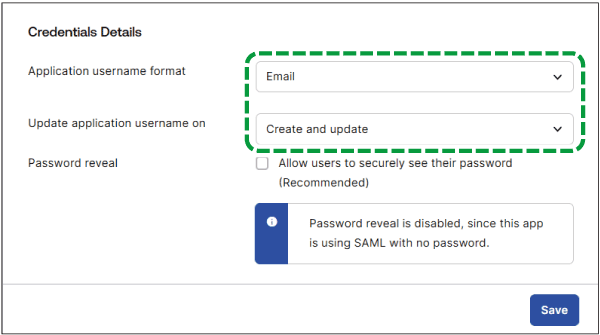
 Enter the items in "Credentials Details" as shown in the following table:
Item name | Value to be specified |
|---|---|
Application username format | |
Update application username on | Create and Update |
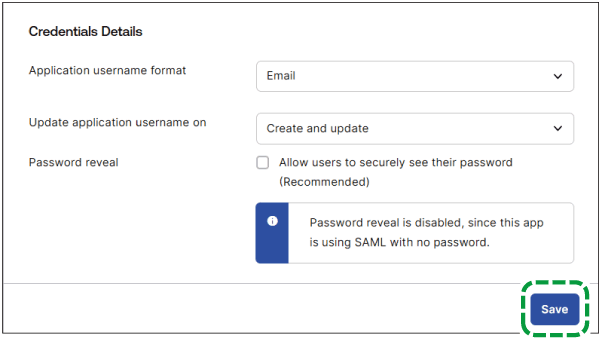
 Click [Save].
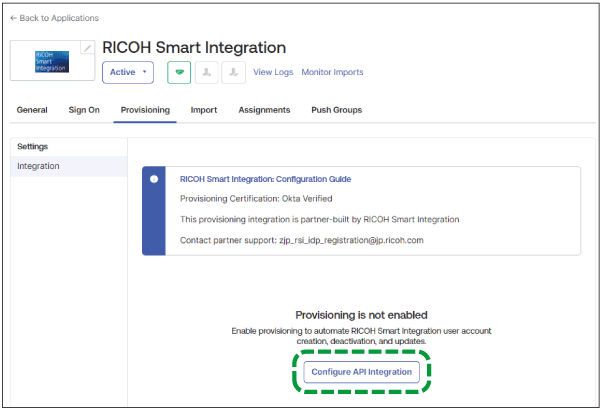
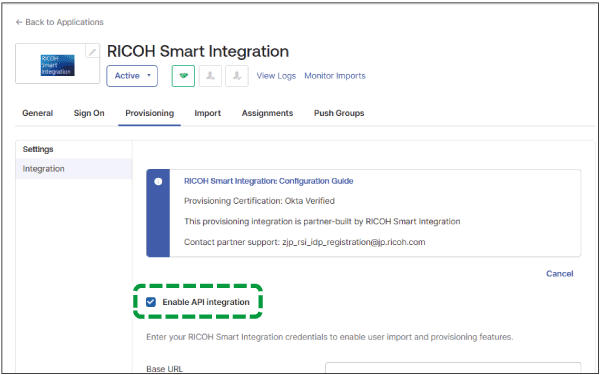
 Open the [Provisioning] tab, and then click [Configure API Integration].
 Check "Enable API Integration".
 On a different screen of your web browser, log in to this site with the administrator account.
 From the top page of Admin Mode, access [User Management].
 Click
Click  , the Menu button, then select [Synchronizing IDs]
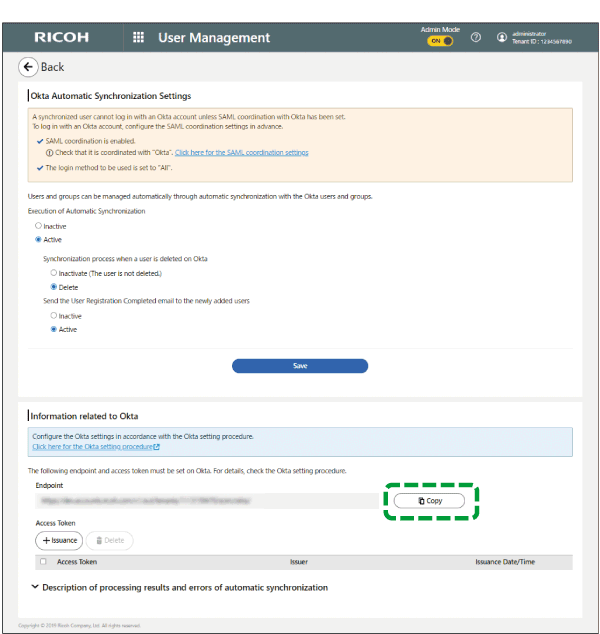
 [Okta Automatic Synchronization].
 In "Information related to Okta", click [Copy] for "Endpoint" (Base URL).
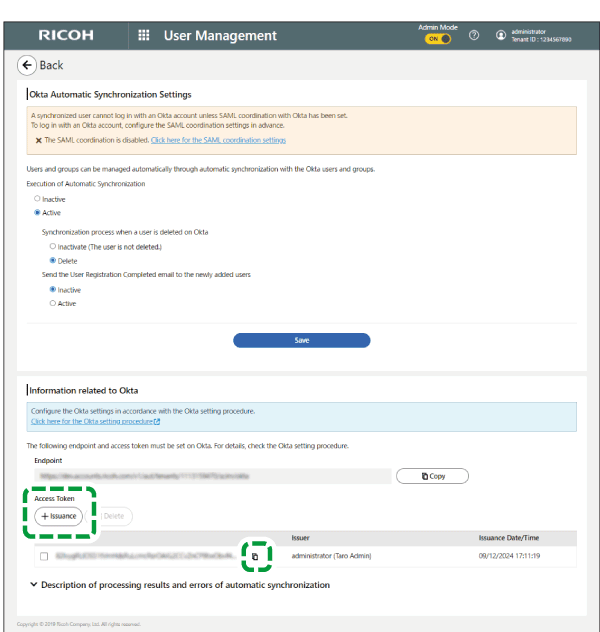
 Click [Issuance] in "Access Token" (API Token), and then click the copy button for the issued token.
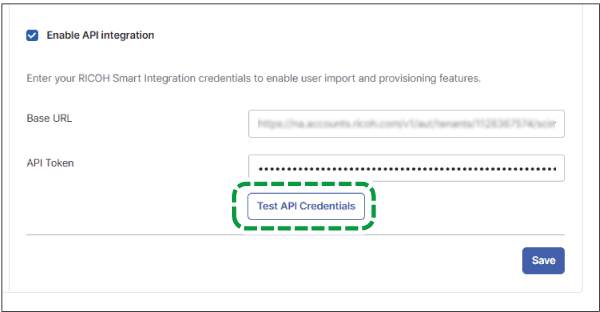
 Return to the Okta screen, and then paste the content of "Base URL" (Endpoint) and "API Token" (Access Token) that you have copied.
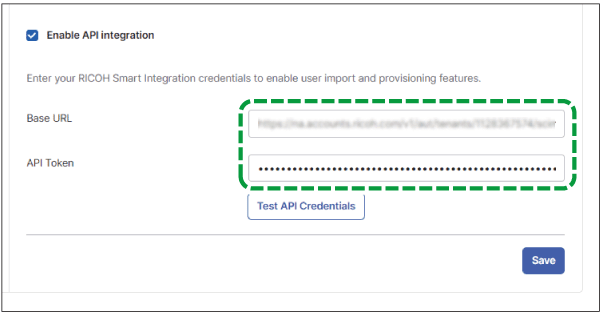
 Click [Test API Credentials] to test the connection.
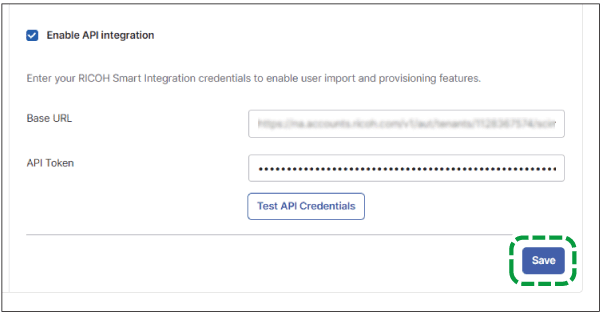
 Click [Save].
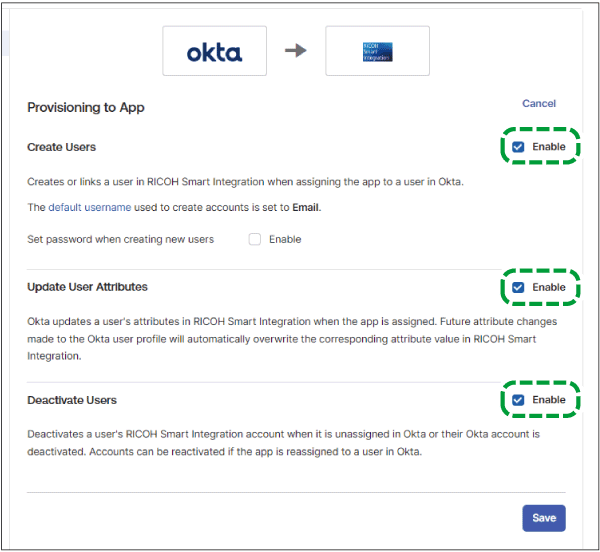
 On the [Provisioning] tab, click [To App], and then click [Edit].
 Select the "Enable" checkbox for provisioning actions that are supported.
Create Users
Update User Attributes
Deactivate Users
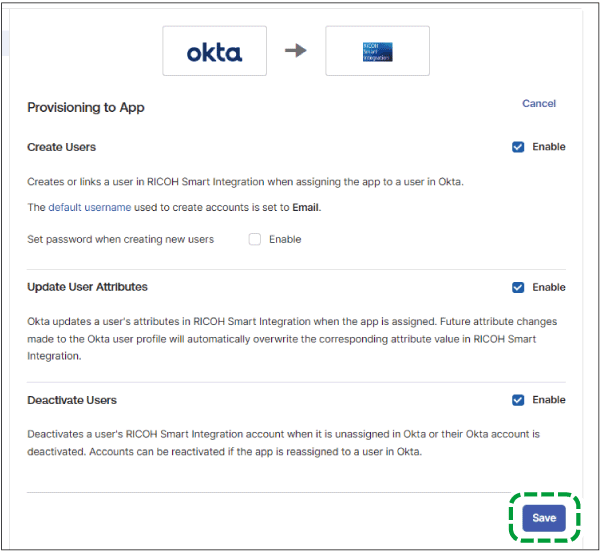
 Click [Save].
3. Supplementary procedures: Adding the department and office location attributes to attributes to be synchronized
This setting is optional.
If you want to synchronize the department attribute of an Okta user to the user's department in this site:
 Find [Department] from an attribute that is not mapped, and then click the edition button.
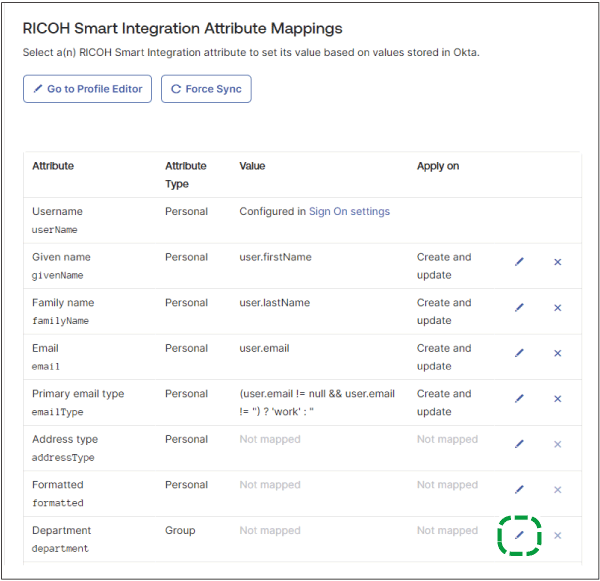
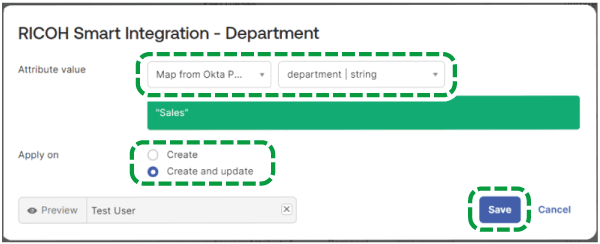
 In the edit screen, configure the following settings:
Select [Map from Okta Profile] for "Attribute value", and then select an Okta attribute to synchronize with Okta user information that can be added as a synchronization target.
Select [Create and update] in "Apply on".
Click [Save].
If you want to synchronize the postalAddress attribute of an Okta user to the user's office location in this site:
 Find [Formatted] from an attribute that is not mapped, and then click the edition button.
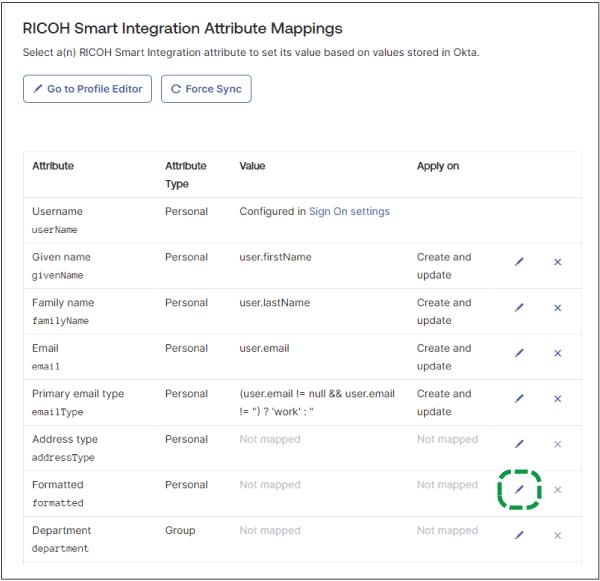
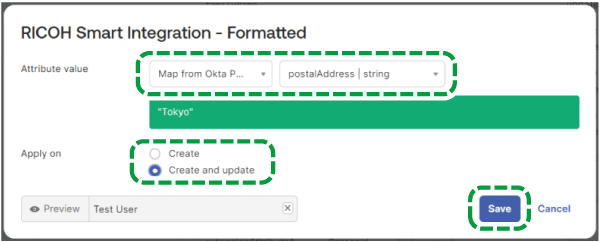
 In the edit screen, configure the following settings:
Select [Map from Okta Profile] for "Attribute value", and then select [postalAddress | string].
Select [Create and update] in "Apply on".
Click [Save].
 Find [Address type] from an attribute that is not mapped, and then click the edition button.
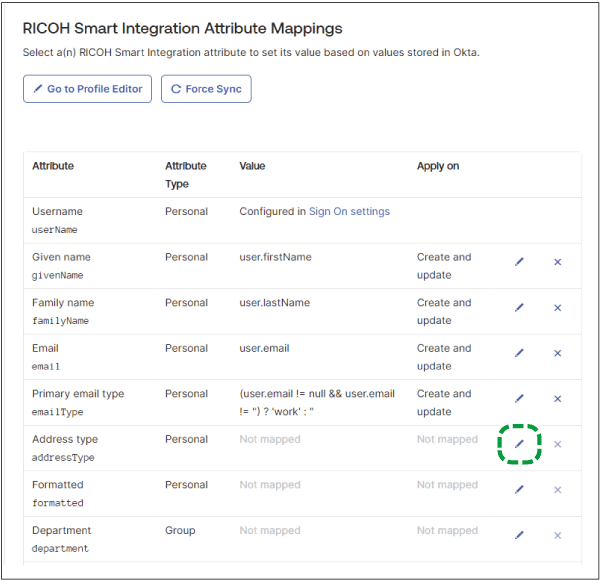
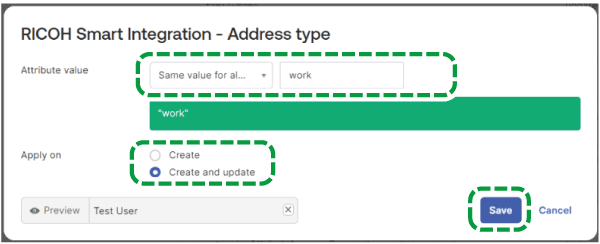
 In the edit screen, configure the following settings:
Select [Same value for all users] for "Attribute value", and then enter "work".
Select [Create and update] in "Apply on".
Click [Save].
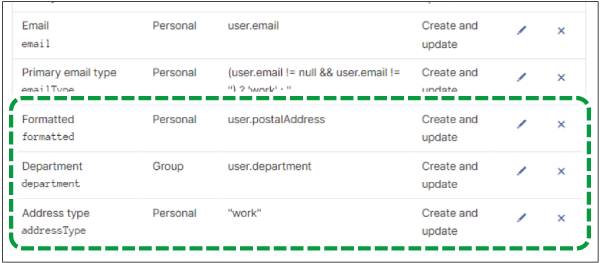
When you specify both user department and office location, they are displayed as shown below.
4. Supplementary procedures: Adding any attribute to attributes to be synchronized
This setting is optional. If you want to synchronize other Okta attributes, follow the procedure below to specify settings. You can synchronize User information in Okta that you can add as the target of synchronization to this site's user optional information 1 through 15.
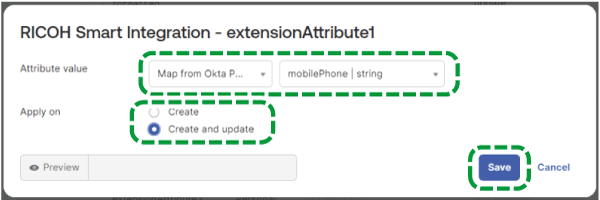
 Select any attribute that is not mapped from "extensionAttribute1" to "extensionAttribute15", and then click the edition button.
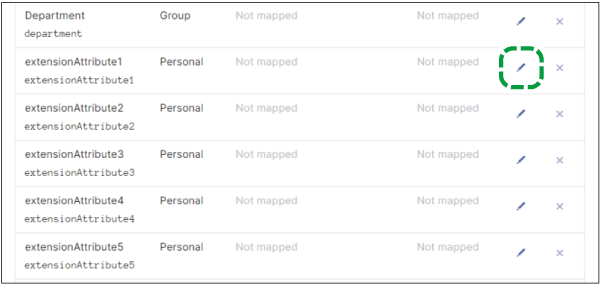
 In the edit screen, configure the following settings:
Select [Map from Okta Profile] for "Attribute value", and then select an Okta attribute you want to synchronize from Okta user User information in Okta that you can add as the target of synchronization.
Select [Create and update] in "Apply on".
Click [Save].
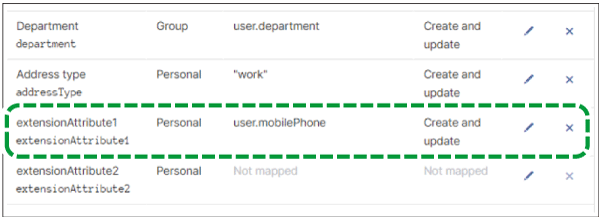
When you specify any attribute, it is displayed as shown below.
5. Supplementary procedures: Adding the Device account and the IC card to attributes to be synchronized
This setting is optional.
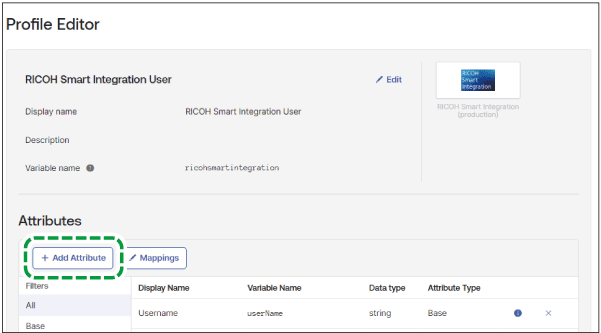
 Click [Go to Profile Editor].

 Click [Add Attribute].
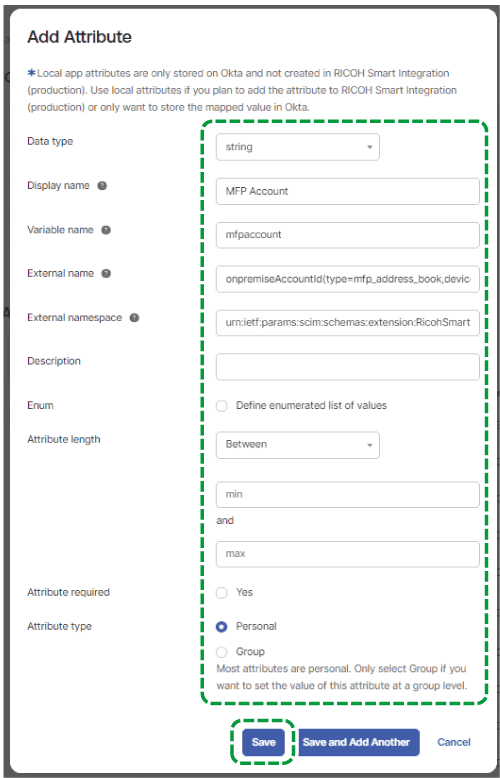
 Specify the items you want to map as shown in the following table, and then click [Save]:
Synchronized item on this site |
Display Name |
Variable name |
External name |
External namespace |
|---|---|---|---|---|
Device account of multifunction printers/copiers in the Device Account Link Settings for a user |
MFP Account |
mfpaccount |
onpremiseAccountId |
urn:ietf:params:scim:schemas: |
IC card of multifunction printers/copiers in the Device Account Link Settings for a user |
MFP IC Card {number} 1 Example: MFP IC Card 1 |
mfpiccard{number} 1 Example: mfpiccard1 |
onpremiseAccountId(type=card, Example: onpremiseAccountId(type=card, |
urn:ietf:params:scim:schemas: |
Device account of Interactive Whiteboard in the Device Account Link Settings for a user |
IWB Account |
iwbaccount |
onpremiseAccountId(type=address_book, |
urn:ietf:params:scim:schemas: |
IC card of Interactive Whiteboard in the Device Account Link Settings for a user |
IWB IC Card |
iwbiccard |
onpremiseAccountId(type=card, |
urn:ietf:params:scim:schemas: |
*1 In place of "{number}", enter a number that corresponds to the IC card 1 to 3 of the Device Account Link Settings. For details about the Device Account Link Settings, see Changing the names of the user optional information field.
 Display the [Provisioning] tab of the application again, and then click [To App].
 Among attributes that are not mapped yet, select the attribute you recently added, and then click the edition button.
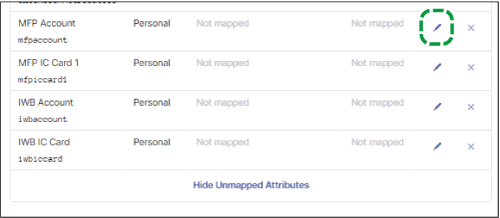
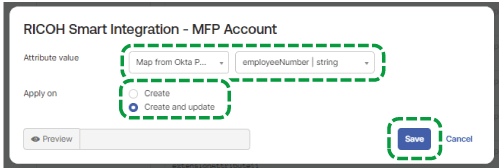
 In the edit screen, configure the following settings:
Select [Map from Okta Profile] for "Attribute value", and then select Okta attributes to synchronize with user information in Okta that can be added as targets of synchronization.
Select [Create and update] in "Apply on".
Click [Save].
When you specify those attributes, they are displayed as shown below.

6. Supplementary procedures: Changing the names of the user optional information field
 On the Add User or Edit User screen, click [View All], and then open the section.
 Click [Item name setting for user optional information]
.
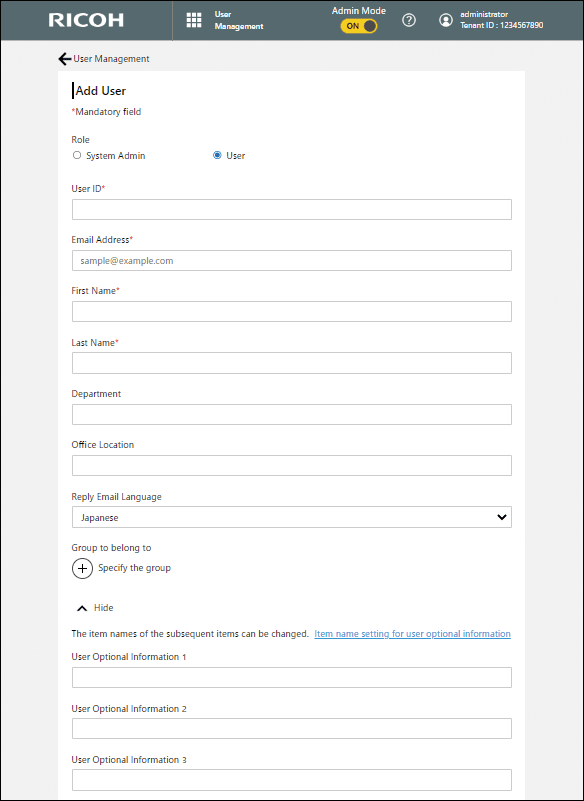
 Enter a new name for each of the user optional information fields.
For information about the specifiable characters, see Specifiable Characters for User Information.
If any of the fields are left blank, the initial name contained in the input field is used.
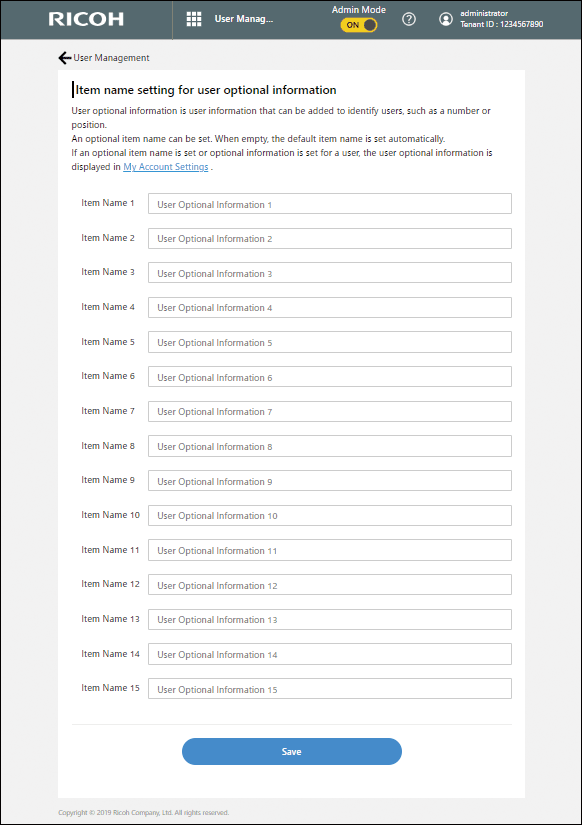
 Click [Save].
7. Synchronizing Users
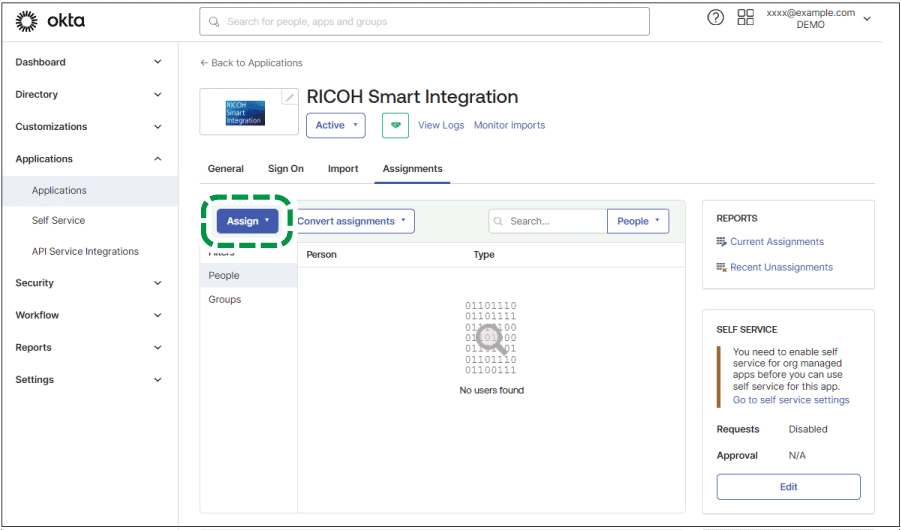
 Navigate to the screen of the application you created, and on the "Assignments" tab, click [Assign].
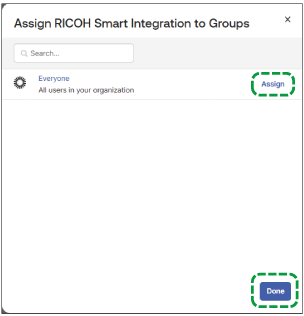
 Click [Assign] for a user or group which contains the user that will use automatic synchronization, and then click [Done].
8. Supplementary procedures: Synchronizing users that are not automatically synchronized
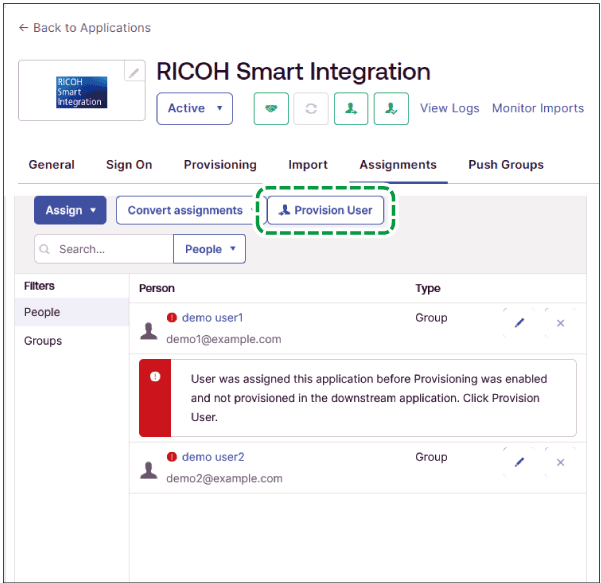
If a user is added to the application but is not automatically synchronized, for example, when the user has already been added before you configure automatic synchronization, perform the following procedure:
 Navigate to the screen of the application you created, and on the "Assignments" tab, click [Provision User].
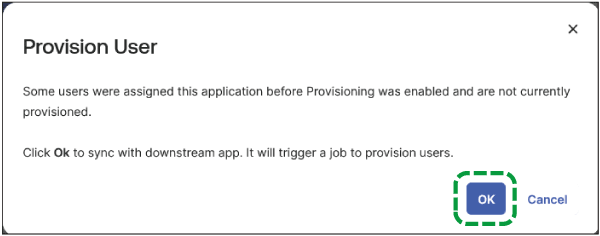
 Click [OK].
9. Synchronizing Groups
Perform the following procedure to synchronize groups:
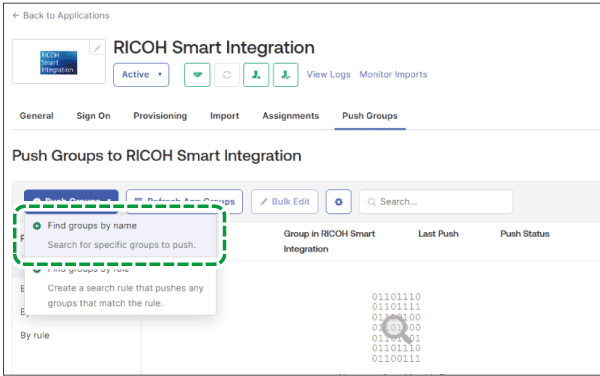
 Navigate to the screen of the application you created, and on the "Push Group" tab, click [Push Groups], and then click [Find groups by name].
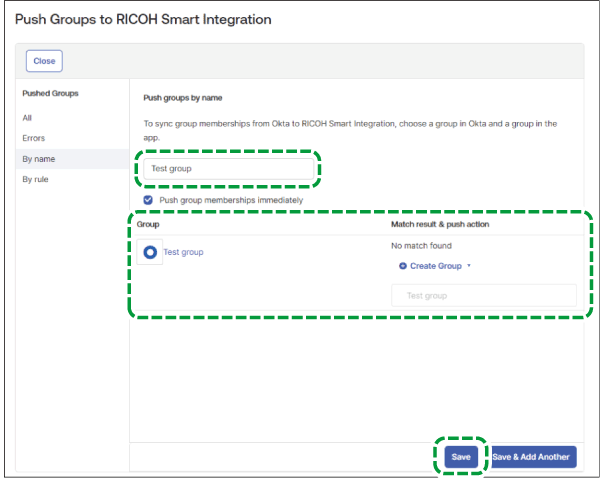
 Enter a group name to be synchronized to [Enter a group to push...] to specify a group that you will synchronize, and then click [Save].
Specify a group that satisfies all of the following conditions:
A group to which all users of the group are added to on the application in 7. Synchronizing users.
A group that is different from the group you used in 7. Synchronizing users.
If a group cannot be synchronized correctly, try the following measures:
Change the group to be added in 7. Synchronizing users to a group such as "Everyone" that contains all users, which is not used for synchronization.
Create another group that contains the same users as the group you added in 7. Synchronizing users, and then synchronize that group.
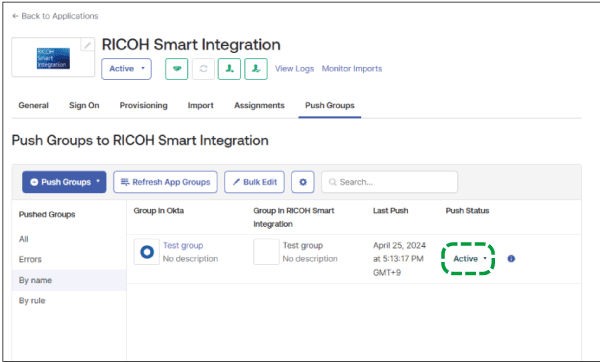
 Check that the "Push Status" for the group that you want to synchronize is set to "Active".
10. Checking the results of automatic synchronization
 Click [View Logs] for the created application.
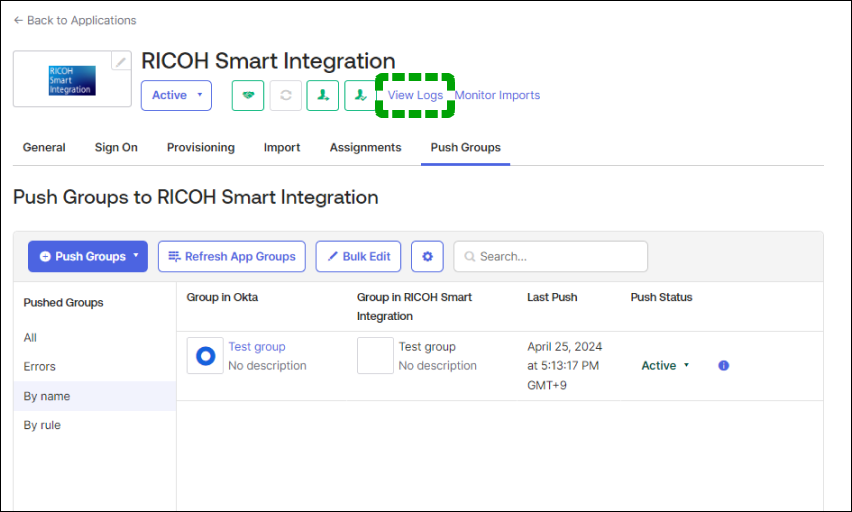
 Click [Advanced Filters].

 Click [Add Filter], and then add an "eventType" filter to contain "application.provision" ("contains").

 Click [Apply Filter], and then check the log.

Notes
User attributes to be synchronized.
The following attributes are supported:
|
Attribute |
Attribute Type |
Value |
Apply on |
Attribute in RICOH Smart Integraion |
Required |
Remarks |
|---|---|---|---|---|---|---|
|
Username |
Personal |
Configured in Sign On settings |
- |
User ID |
Required |
|
|
|
Personal |
user.email |
Create and update |
Email address |
Required |
|
|
Primary email type |
Personal |
(user.email != null && user.email != '') ? 'work' : '' |
Create and update |
Information for synchronizing email address |
Required |
|
|
Given name |
Personal |
user.firstName |
Create and update |
Given name |
Required |
If the value for this property is not specified on Okta and one of the following conditions is met, synchronization may not occur:
|
|
Family name |
Personal |
user.lastName |
Create and update |
Family name |
Required |
Same as above |
|
Department |
Group |
user.department |
Create and update |
Department |
Optional |
Same as above |
|
Formatted |
Personal |
user.postalAddress |
Create and update |
Office Location |
Optional |
|
|
Address type |
Personal |
"work" |
Create and update |
Information for synchronizing office location |
Optional |
If the value entered for this property exceeds the maximum number of characters, only the portion from the beginning to the maximum is used. |
|
extensionAttribute1 ~ extensionAttribute15 |
Personal |
Create and update |
User Optional Information 1 to 15 |
Optional |
Refer to User attributes that can be added. |
Group attributes to be synchronized.
The following attributes are supported:
|
Attribute |
Attribute in RICOH Smart Integraion |
Remarks |
|---|---|---|
|
name |
Group name |
If the value entered for this property exceeds the maximum number of characters, only the portion from the beginning to the maximum is used. |
Group member information is also synchronized. Members not synchronized from Okta are not affected.
Group ID and description are not synchronized. Each initial group ID is a random character string.
RICOH Smart Integration is not synchronized to Okta. If you updated the information only in RICOH Smart Integration, manually correct it in Okta or resynchronize.
User attributes that can be added
The following attributes are supported:
If user optional information exceeds the maximum number of characters, the portion from the beginning to the maximum of the information is used as the user optional information.
If the value for this property is not specified on Okta and one of the following conditions is met, synchronization may not occur:
The users use this service and are not marked as "registered".
The users' email addresses do not match between this service and Okta.
|
Display Name |
Variable Name |
Remarks |
|---|---|---|
|
Middle name |
user.middleName |
|
|
Honorific prefix |
user.honorificPrefix |
|
|
Honorific suffix |
user.honorificSuffix |
|
|
Title |
user.title |
|
|
Display name |
user.displayName |
If Display name has no value set so far, "user.firstName{single-byte space}user.lastName" is synchronized. However, please note that this depends on the Okta specifications and it may change. |
|
Nickname |
user.nickName |
|
|
Profile Url |
user.profileUrl |
|
|
Secondary email |
user.secondEmail |
|
|
Mobile phone |
user.mobilePhone |
|
|
Primary phone |
user.primaryPhone |
|
|
Street address |
user.streetAddress |
|
|
City |
user.city |
|
|
State |
user.state |
|
|
Zip code |
user.zipCode |
|
|
Country code |
user.countryCode |
|
|
Preferred language |
user.preferredLanguage |
|
|
Locale |
user.locale |
If this item has no value set, it is set to "en_US". However, please note that this depends on the Okta specifications and it may change. |
|
Time zone |
user.timezone |
|
|
User type |
user.userType |
|
|
Employee number |
user.employeeNumber |
|
|
Cost center |
user.costCenter |
|
|
Organization |
user.organization |
|
|
Division |
user.division |
|
|
ManagerId |
user.managerId |
|
|
Manager |
user.manager |
Specifiable Characters for User Information
Item | Specifiable characters |
|---|---|
User ID |
|
Email address |
|
First/family name |
|
Department Office Location |
|
Password |
|
User Optional Information 1 to 15 |
|
Known Issues
N/A

